Training Manual for School Admin
Login
How to login into School Diary?
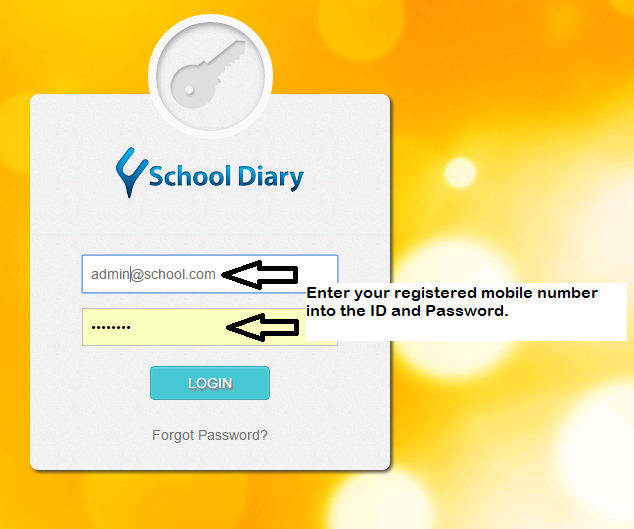
To login into School Diary enter your registered mobile number in the ID and given password in the password field and click on the Submit button. Please check with School Diary support team OR your school admin if you are not sure about your ID & Password details.
What if I have forgotten my password?
Please check with your School admin or School Diary support team if you are not sure about the ID & the Password details.
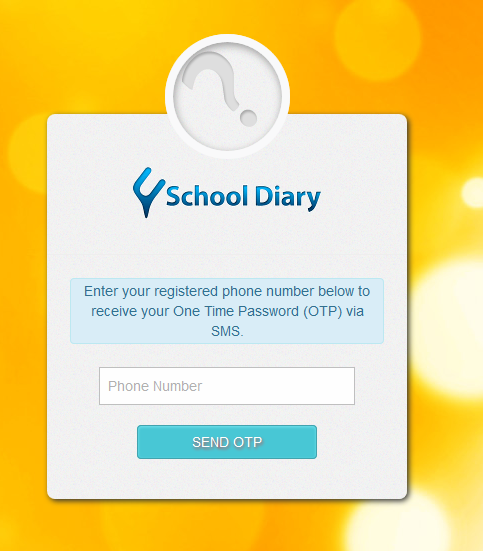
Alternatively, if you have forgotten your password then click on "Forgot Password?" link .
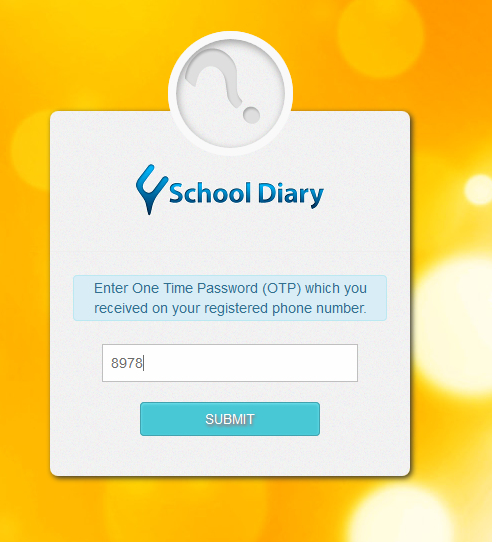
Customers outside Indian Subcontitent should use the registered email ID instead of phone number for getting the OTP.
Enter your registered mobile number (or email for customers outside Indian Subcontitent) and request an OTP. Once you get the OTP (One Time Password), use that to reset your password and login. Here are the steps –
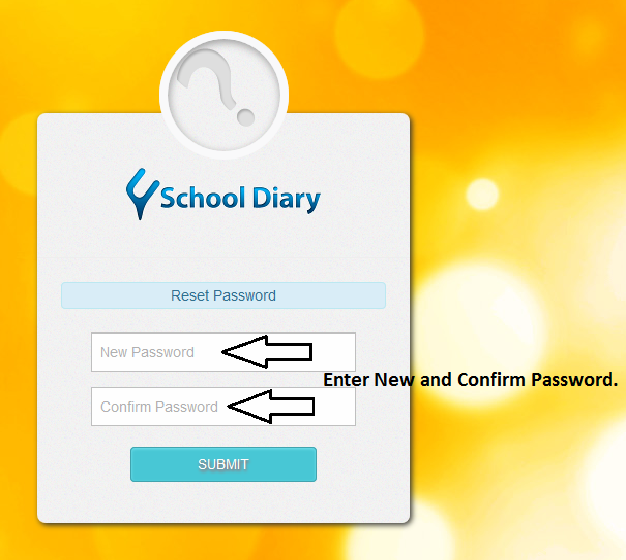
Enter the OTP (One Time Password) that you have received on your registered mobile number (or email ID). And click on the submit button. You can then reset your password by entering new and confirm password details. Click on submit when done.
Messages
How can I send a message?
To send a message click on "Messages" tab on the left menu, select recipients/broadcast list, type your message in the message box and click on "Post".
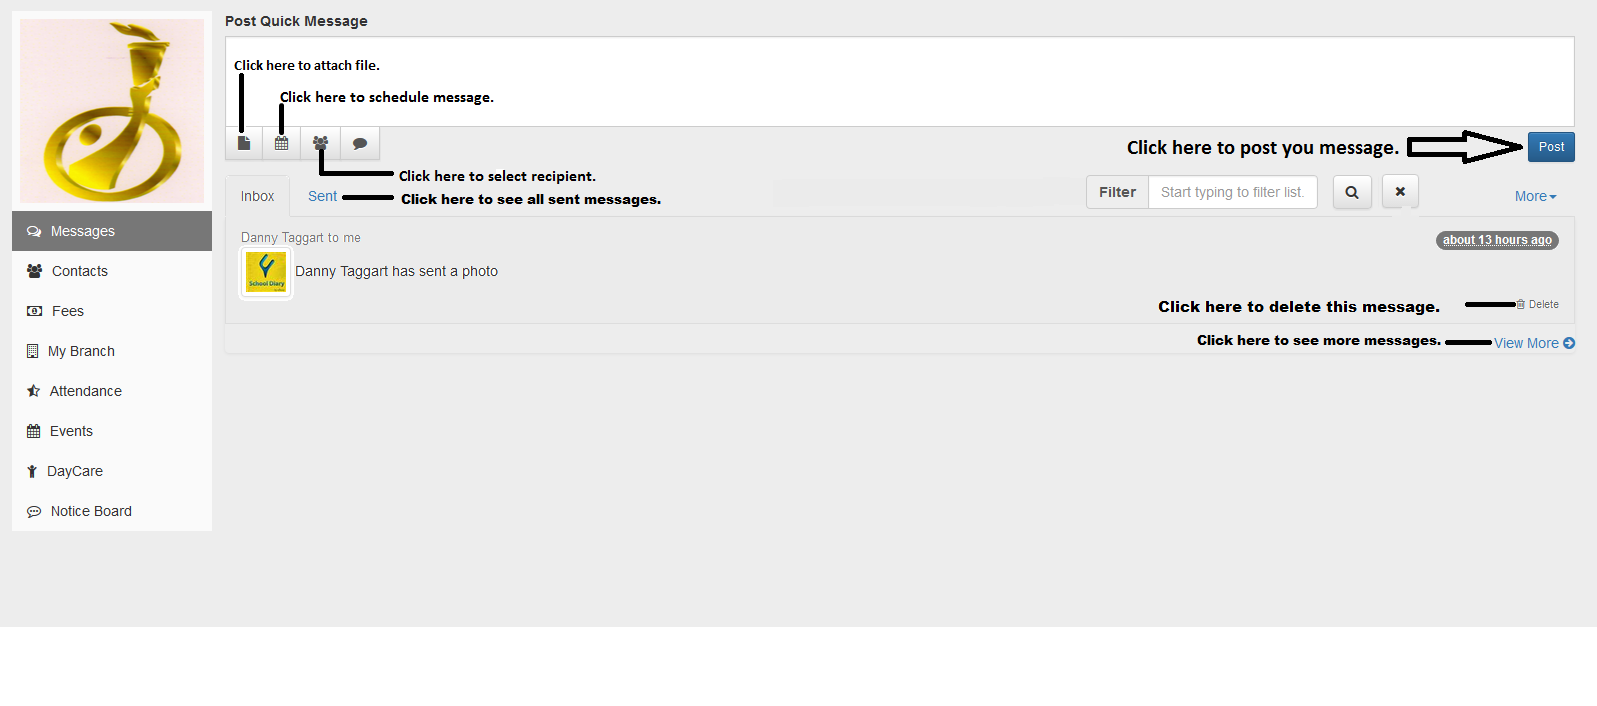
You can also attach up to 10 images (total file size of 10 mb all put together) in one go. To attach click on the attach file icon and simply drag and drop your image to the attachment tab and click on Post.
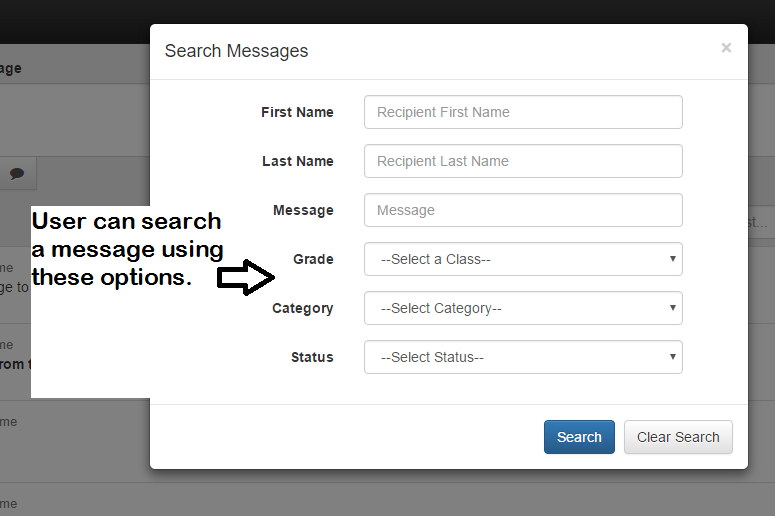
How can I search a message?
There are two ways to search a message. First, you can search by the recipient name or message text or message status type etc using the filter. Second, you can click on the search button and can choose multiple search criteria(s). You can cancel the search by clicking on the close button. Here are the steps-

How can I approve or reject a message?
Only Admin and Teacher Coordinator can approve or reject a message. To see all the pending approvals click on 'More' and then click on 'Pending for approval' option. To see all rejected and approved messages click on the 'Rejected messages and' and 'Approved Messages' respectively.
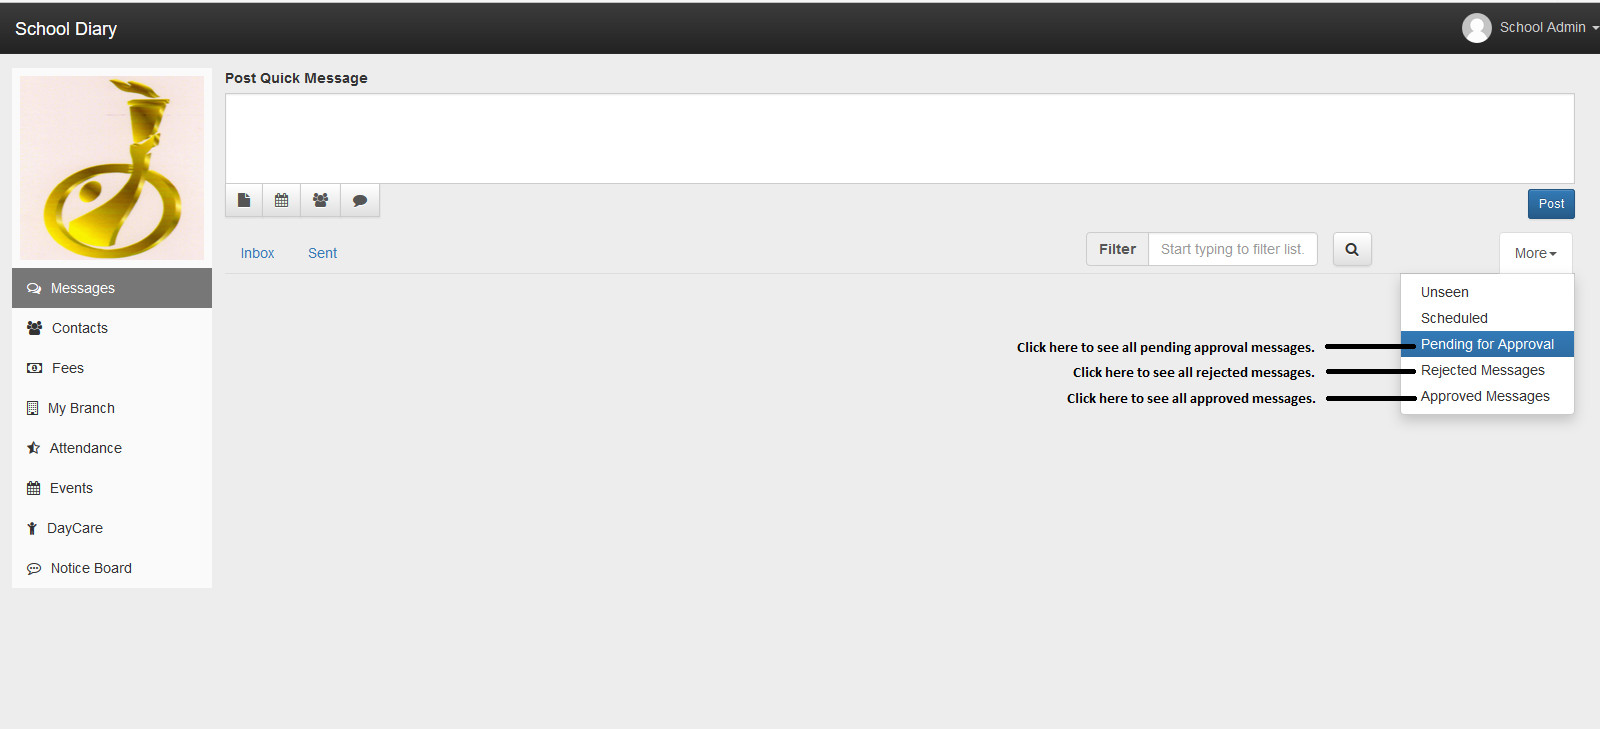
Once you get the list of pending messages, you can approve or reject each message by clicking on the respective approve or reject link.
To edit a message, click on the message and go to message detail screen. Once you are in, you can click on the edit button to edit the message.
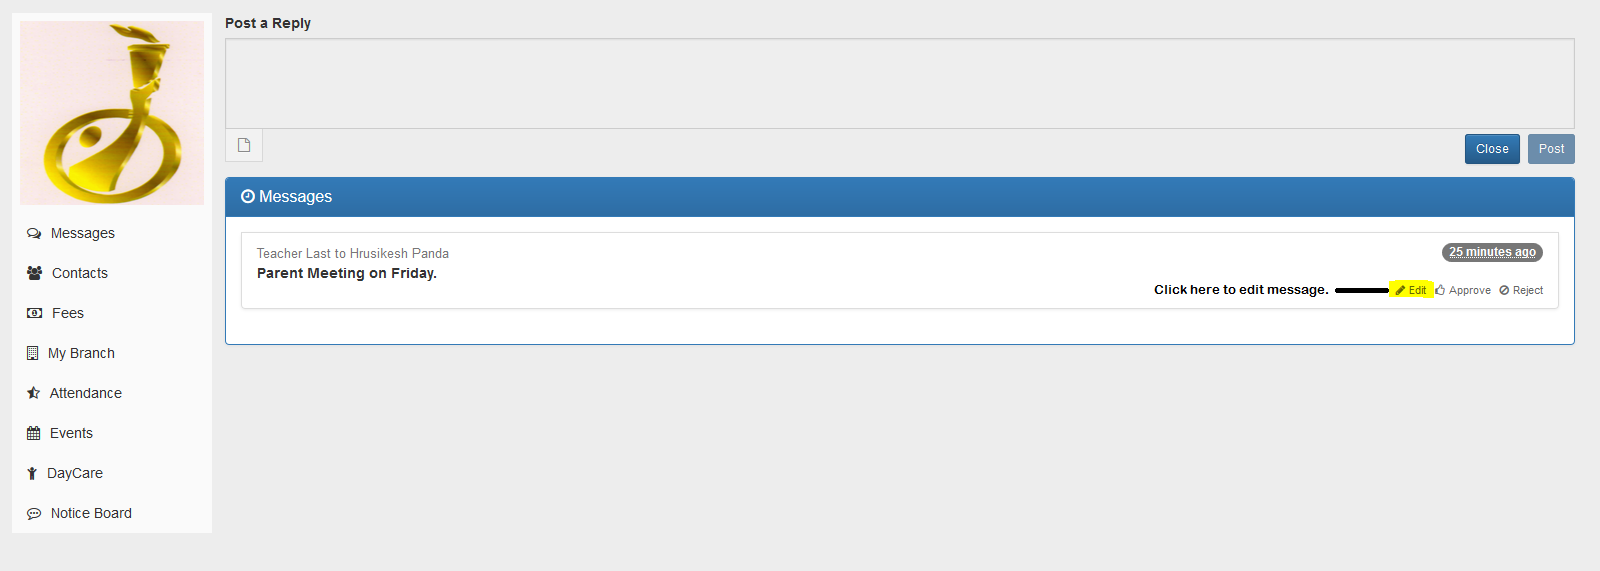
How can I close a conversation?
To close any conversation thread you can click on that conversation thread and open it. Once the conversation thread opens you can close the thread by clicking on the 'Close' button on the top right.
Once closed, no replies can be sent on that conversation thread.
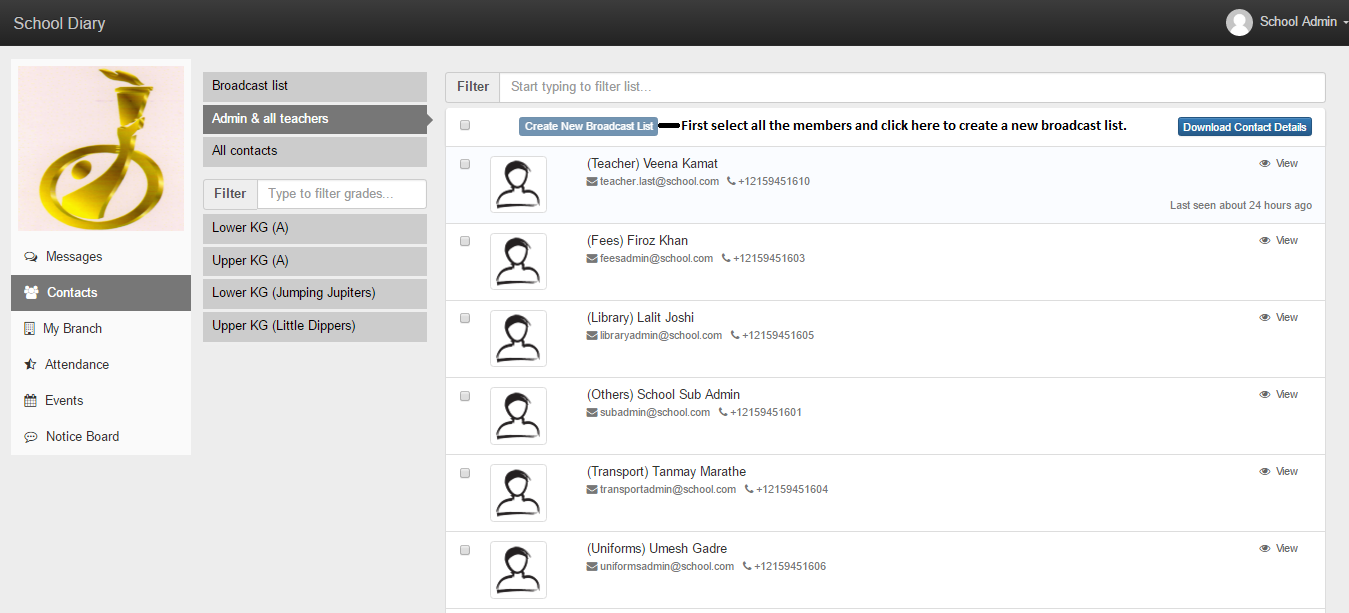
Contacts
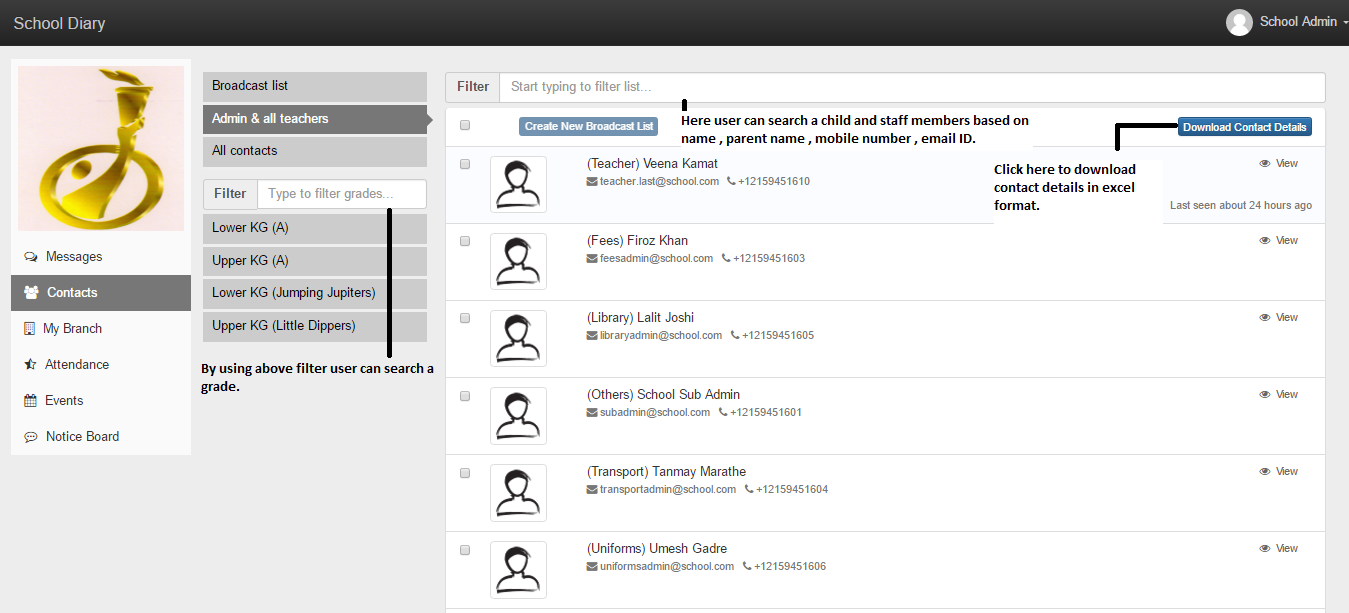
How do I search for a child or a staff member in School Diary?
These are two methods through which you can search a child. Click on 'Contacts' tab on the left menu and after that -
- You can then either select 'All contacts' option and search.
- Or you can select child's grade and search.
You can search using child name, class, parent name, parent email id or parent phone number.
You can also search for a staff by using 'Admin and All Teachers' List.
There are two filters in the contacts.
- First filter is for a grade; by using it you can search for a grade name.
- Second filter is for contacts; by using it you can search a child name.
You can also download the excel dump of all contact details by clicking on the 'Download Contact Details'.
What is the purpose of a broadcast list and how many lists can I create?
Broadcast list is same as BCC funciton of email. Using broadcast list you can send a message to many parents in one go. To do so,just select the broadcast list as a recipient and post your message. You can create more than one broadcast lists.
Broadcast list are unique to every user and are not shared. Each admin or teacher has to create their own.
Please note that broadcasted messages are delivered one on one. To send a message to the whole class we recommend using Class Notice Board option
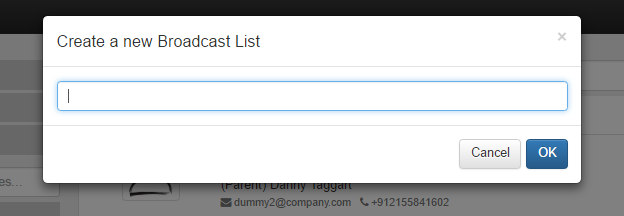
How do I create a new broadcast list?
To create a new broadcast list first select atleast two members (you can select as many members as you want) from contacts by selecting the check box on the left of every contact name, and click on the "Create new broadcast List". After that enter a suitable name for the broadcast list and just click on OK.
You can create a broadcast list for one grade. For that you have to select that grade. Once inside, you can either select the check all button placed before the "Create new broadcast list" button OR you can select individual contacts.
On the pop-up window you can enter a suitable name for the broadcast list.
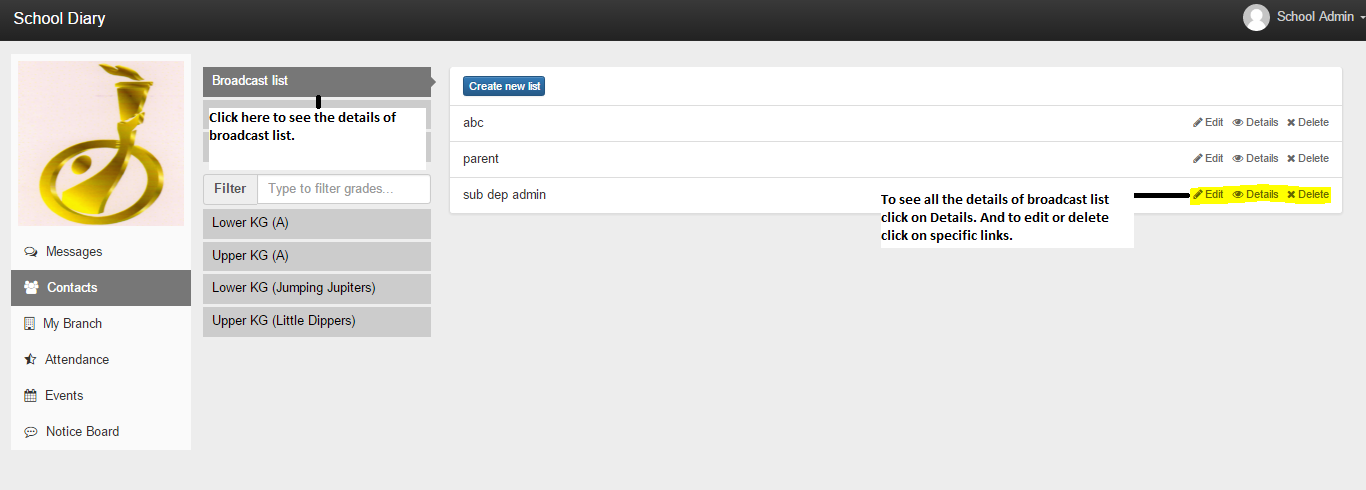
How can I see the details of a broadcast list?
You can see all broadcast lists in the broadcast list section in contacts. And can view all the details of each and every broadcast list also edit or delete it.
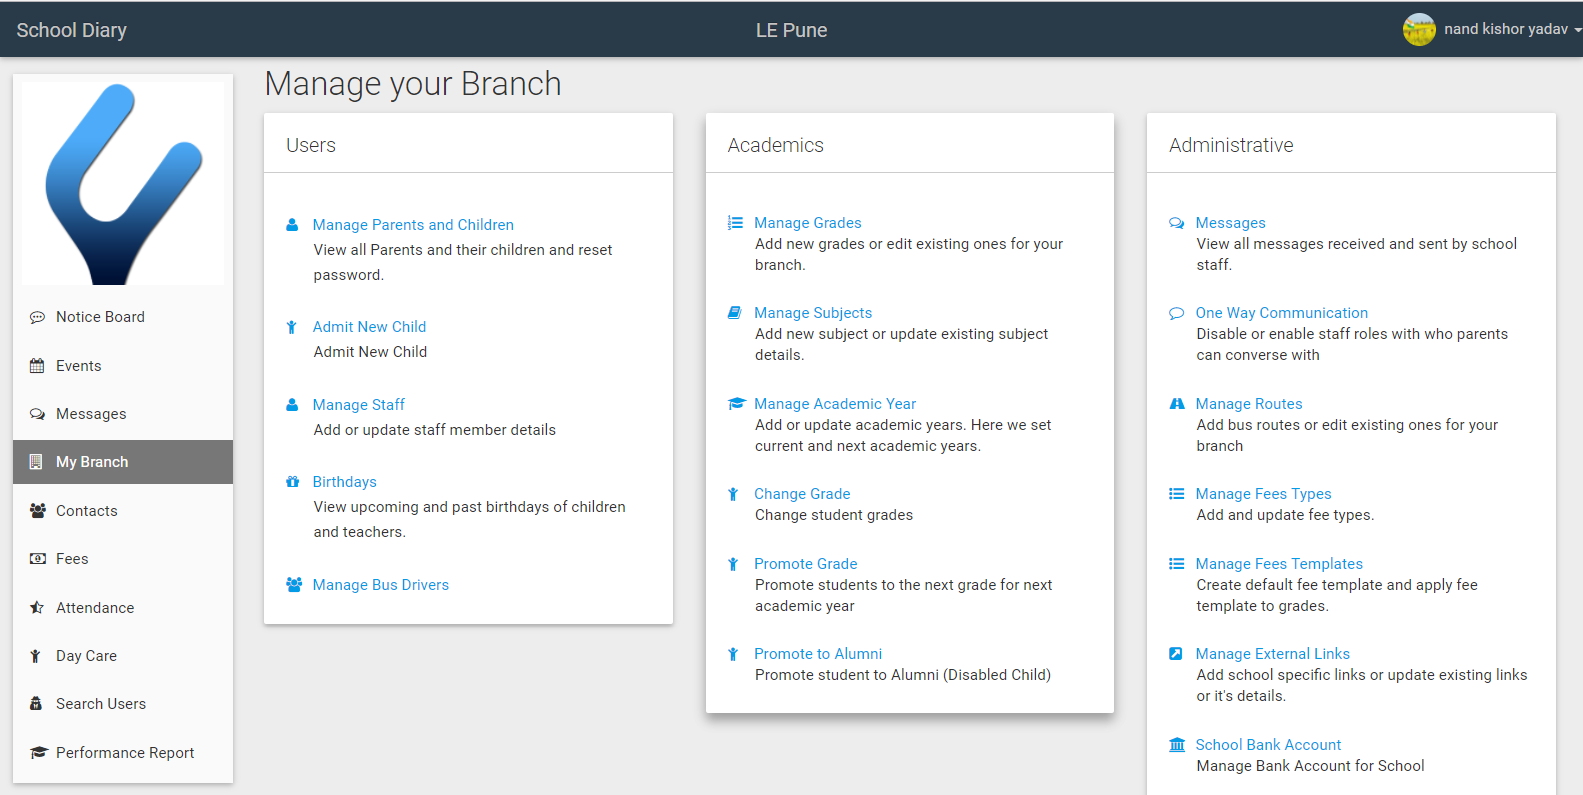
My Branch
What are the features of "My Branch"?
My Branch is specially created for the branch admin. It is one place from where admin can easily manage user, administrative & academic tasks. Below mentioned features are available in My Branch under the three sections .
Users
- View all Parents and their children and reset their password.
- Admit a new child, Remove a child.
- Manage staff members & bus drivers.
- See upcoming and past Birthdays of children and teachers.
Academics
- Manage grades - add & edit.
- Manage subjects - add, edit & delete.
- Assign subjects and teachers to the grade.
- Assign subjects to the Teacher.
- Promote students to the next grade.
- Mark students as Alumni
Administrative
- Messages - View all the messages received and send by school staff.
- Manage one way messaging for each role.
- Manage Bank accounts for School and Vendors.
- Manage fees type and fees templates.
- Manage Routes and add Bus Drivers.
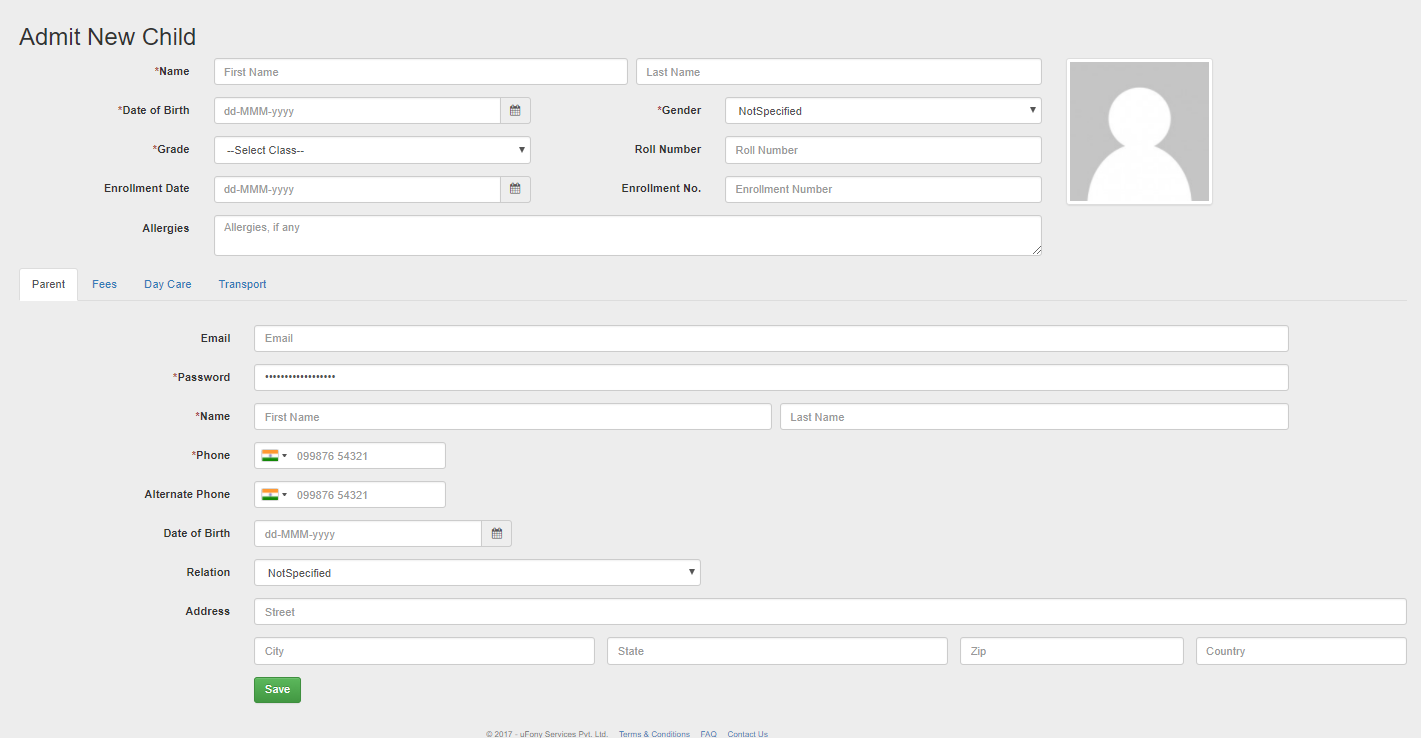
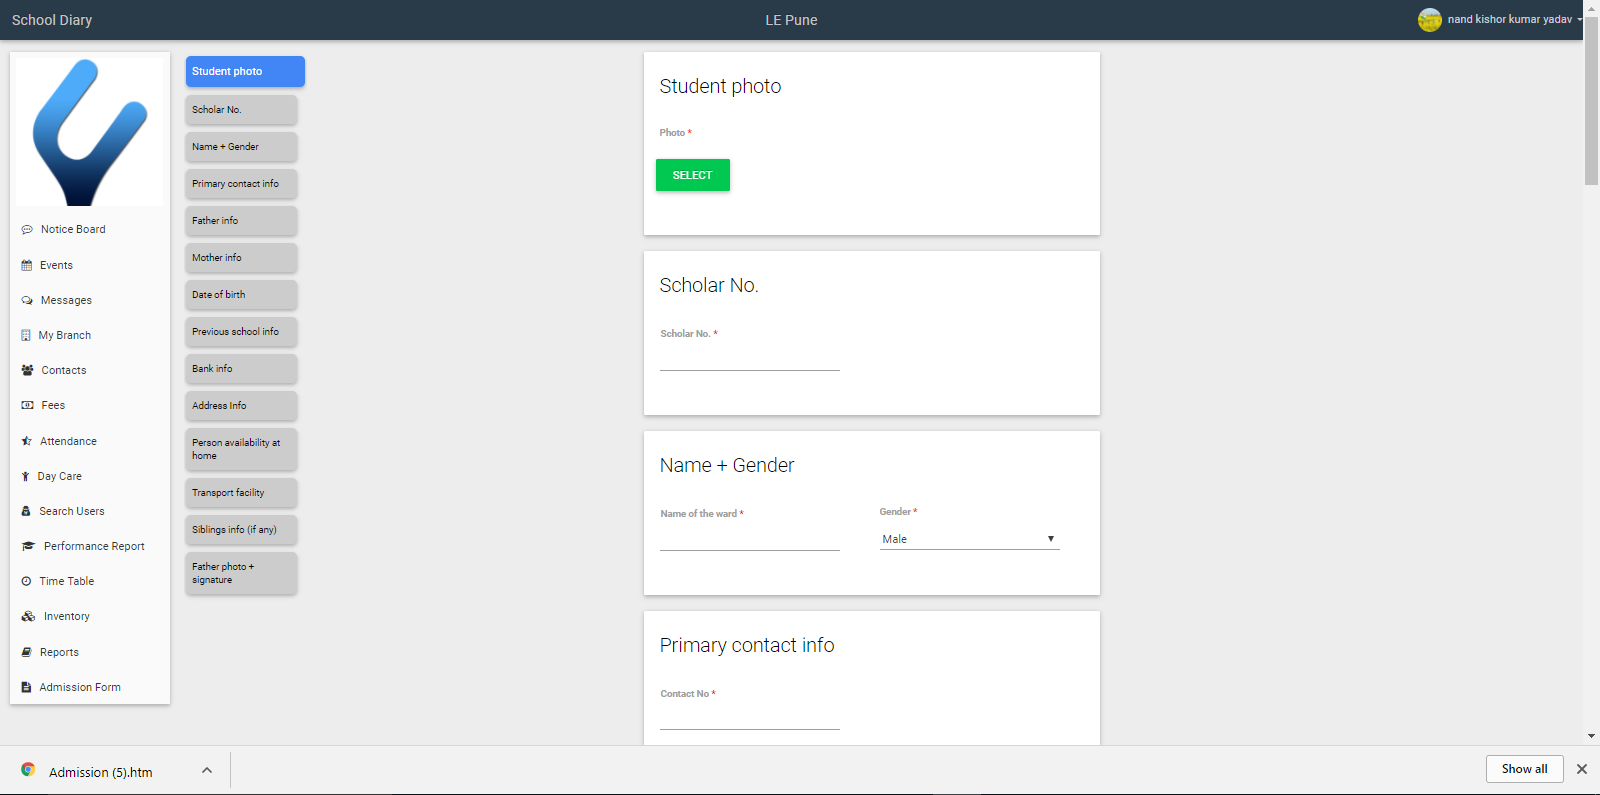
How can I add a new student or edit existing one?
To add a new student please follow the steps below-
Select 'Admit New Child' link from the user section under My Branch tab. Fill all details for the student and parent (Fields marked with red star are mandatory fields). Click on Save to add the student into the School Diary. (School admin can choose a default password for all Parents)
To edit existing students please follow below steps.
Search the student by using 'Search User' tab on the left menu (Admin can search the student by first name, last name, registered mobile number and registered email address). Select 'edit' link and update the details and save. Admin can also add sibling of existing child by using ' Add Sibling' link


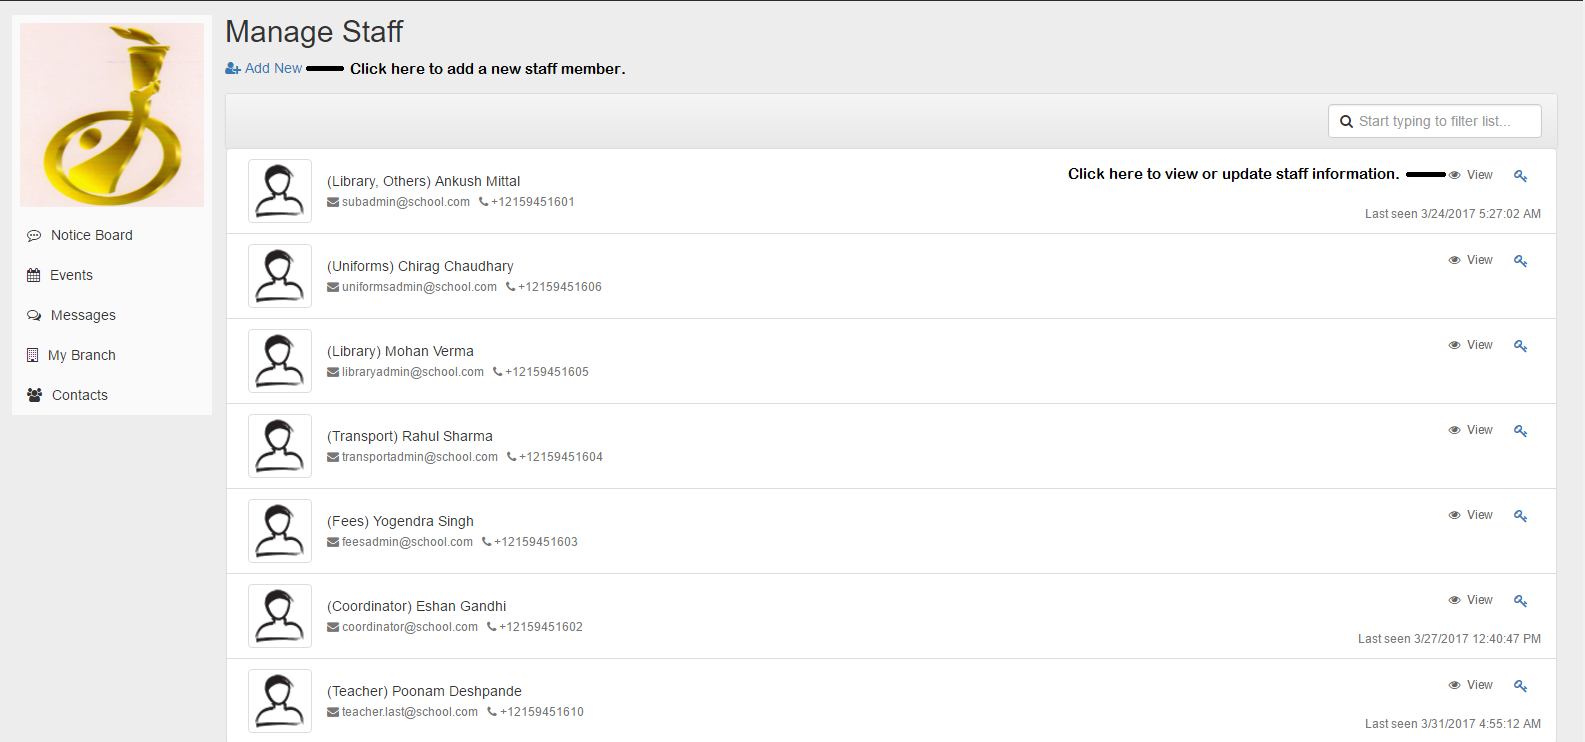
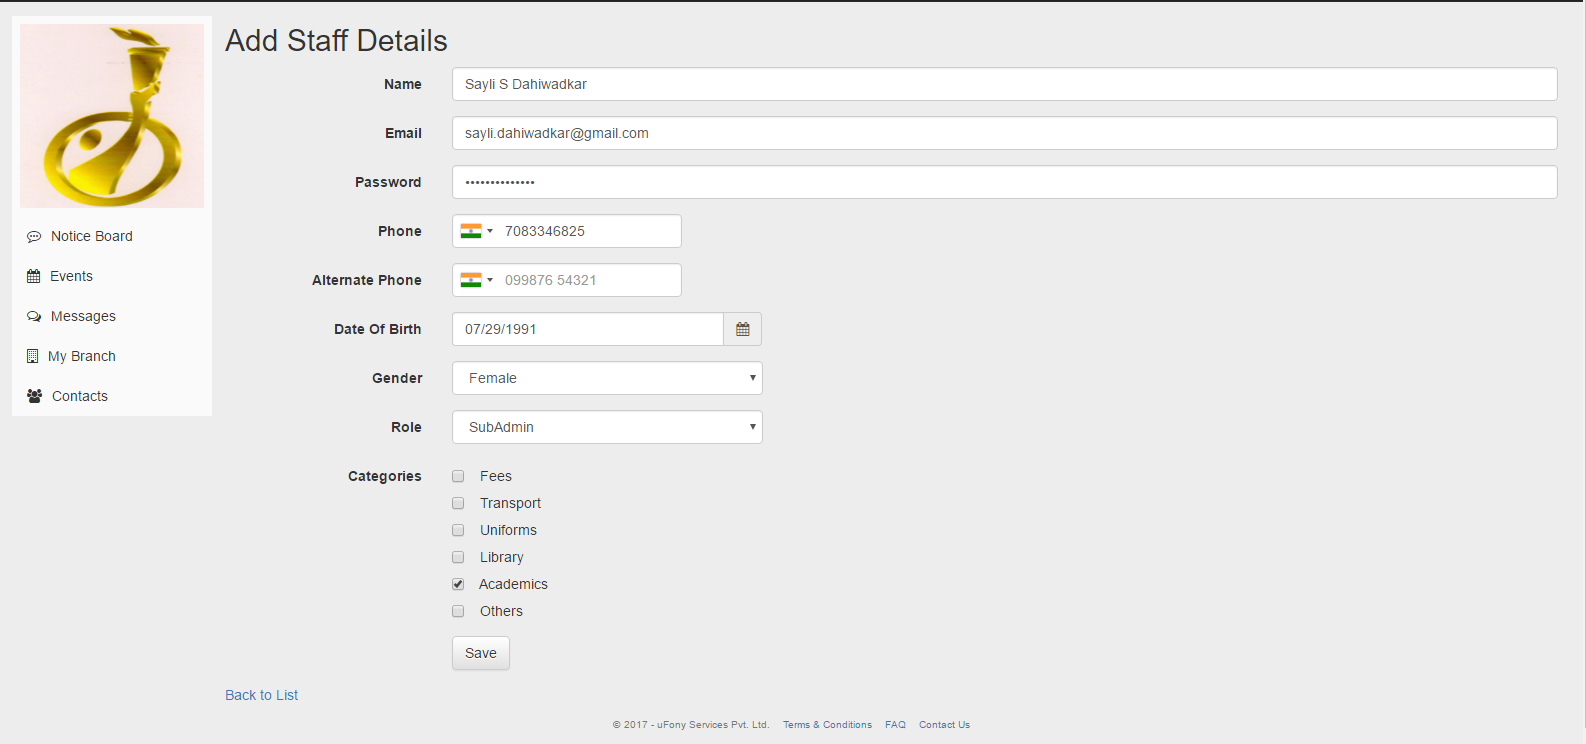
How can I add or update information of staff members?
To add or update staff information use 'Manage Staff' link from the user section under My branch tab. Click on 'Staff' button then you will get all staff members list. To add a new staff member click on 'Add New' link and fill all required information. And to view or update details of any staff member click on 'View' link.
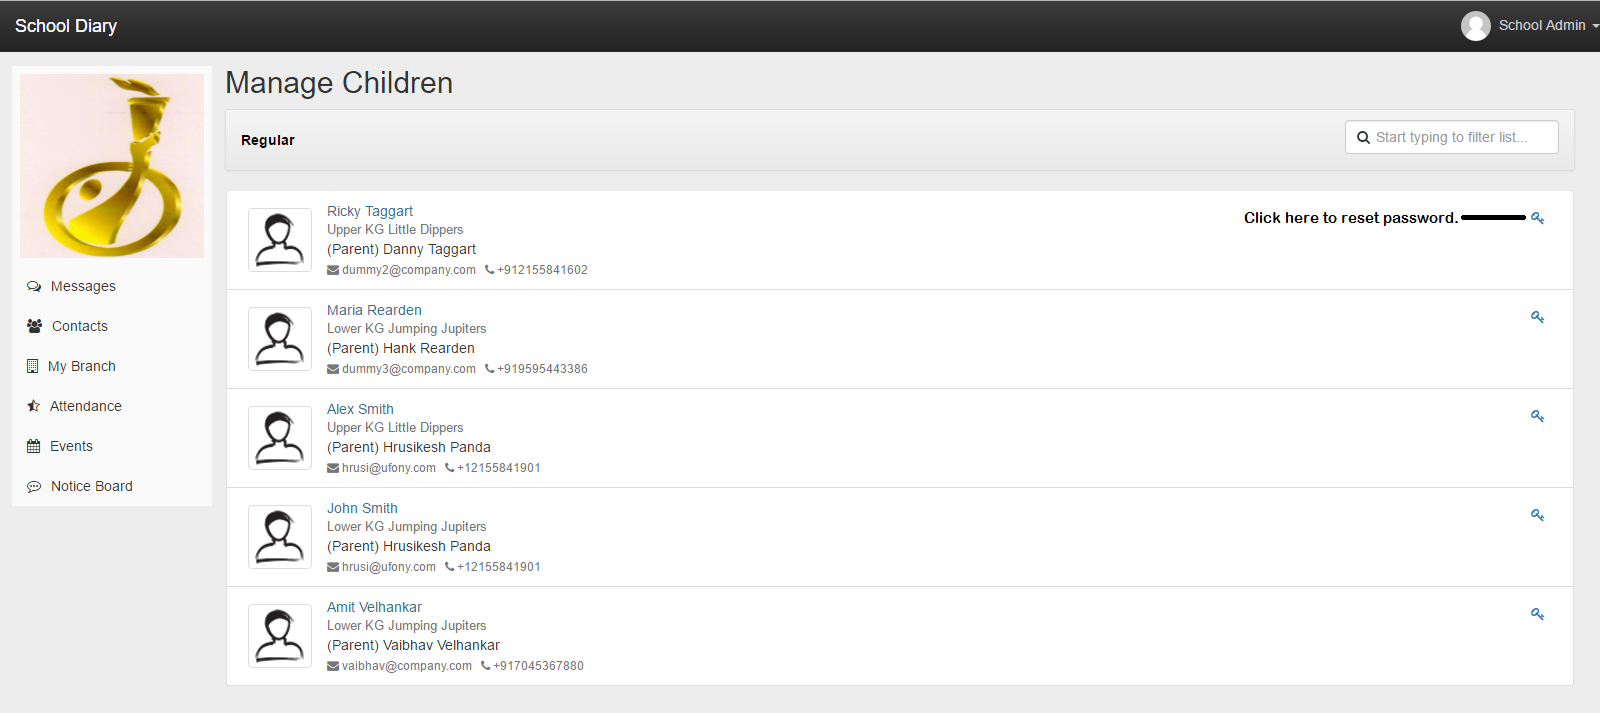
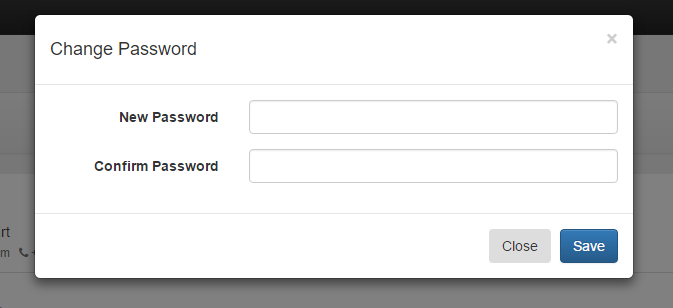
How can I reset a password for parents and teachers?
To reset the password for a parent click on "Manage Children" link from the user section under My branch tab. Search for a child or a parent name and click on the key icon on the right side of the screen. After that enter "New and Confirm password"?
To reset a password for teacher click on "Teachers" link on Manage Teachers tab. Further follow the steps as above.
What is the differnce between grade & class?
Grade or class are different names used to represent a class in a school. For example a school may have two sections for Class I - I(A) & I(B). A school may prefer to call these classes as Grade I(A) & I(B).
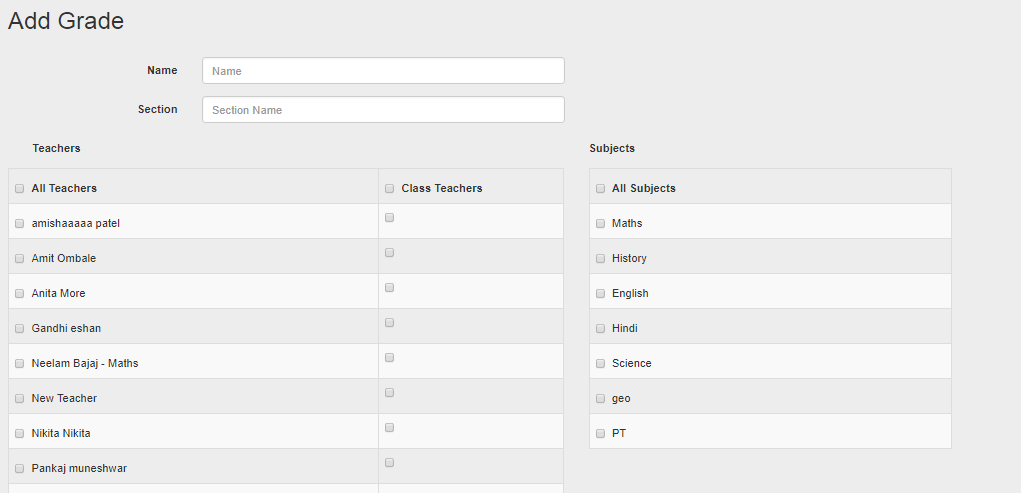
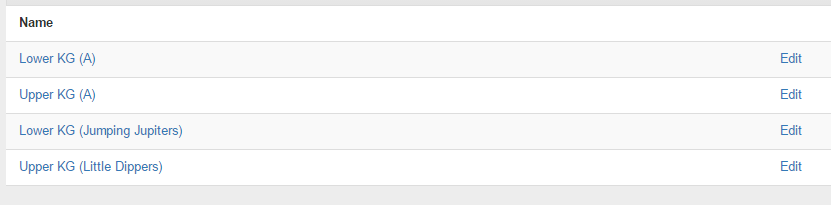
How can I create a new grade/class?
Select 'Manage Grades' link from the academic section under My branch. Click on 'Create Grade' and enter name of the grade and section. Select Teachers and subjects for the grade and click on 'Save'.
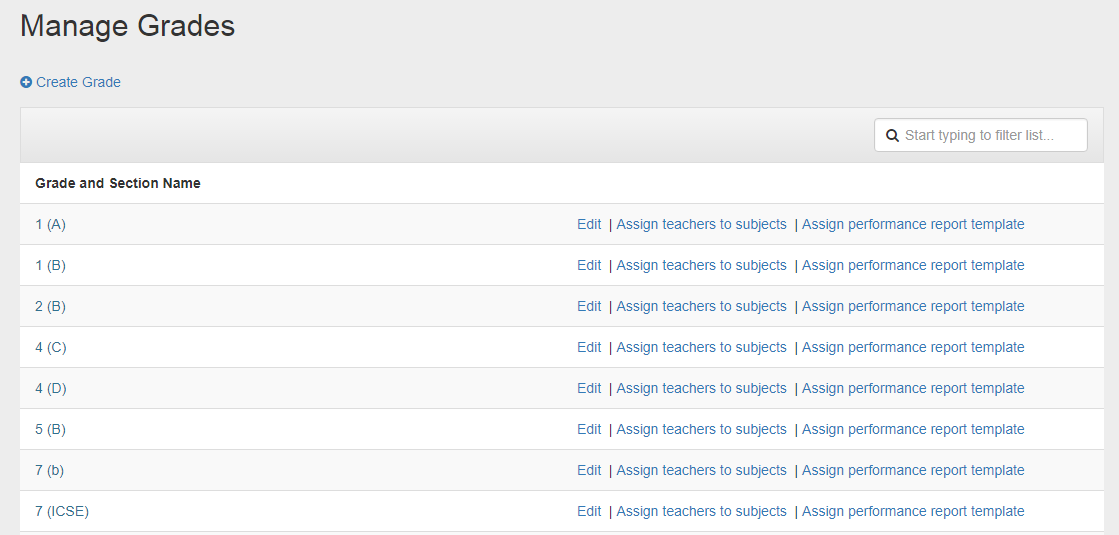
Please note that grade/class once created can’t be deleted
What is difference between change grade and promote grade?
Change Grade is to change the child's grade in the same academic year. For example a parent may want to demote a child to a lower class if his/her performance is not upto the mark OR school may change the section for one child/many children from say I(A) to I(B)
However, Promote grade option is to promote the child to higher grade for the next academic year. At the end of the year after the results are announced, School admin can promote children to next grade in bulk using the promote grade option.
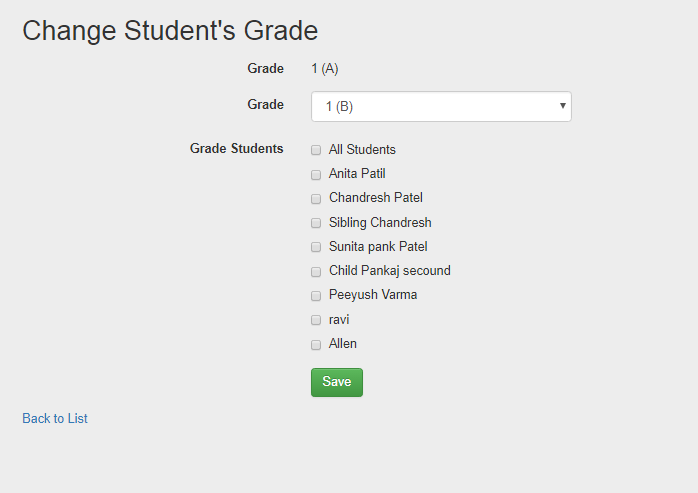
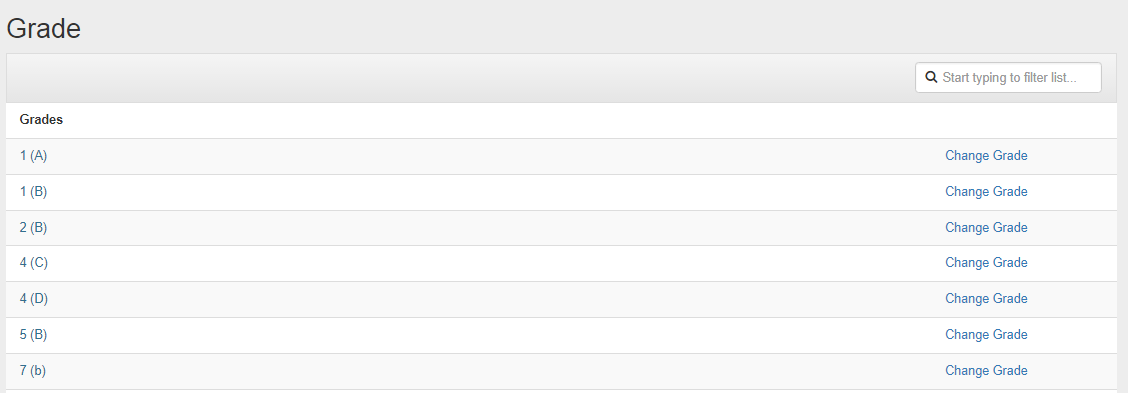
How can I change the grade of child for the current academic year?
Select 'Change Grade' link from the academic section under My branch. There is 'Change Grade' option in front of each and every grade name. Select the 'Change Grade' option for particular grade. Select the new grade for the child and select child name and click on the 'Save'.
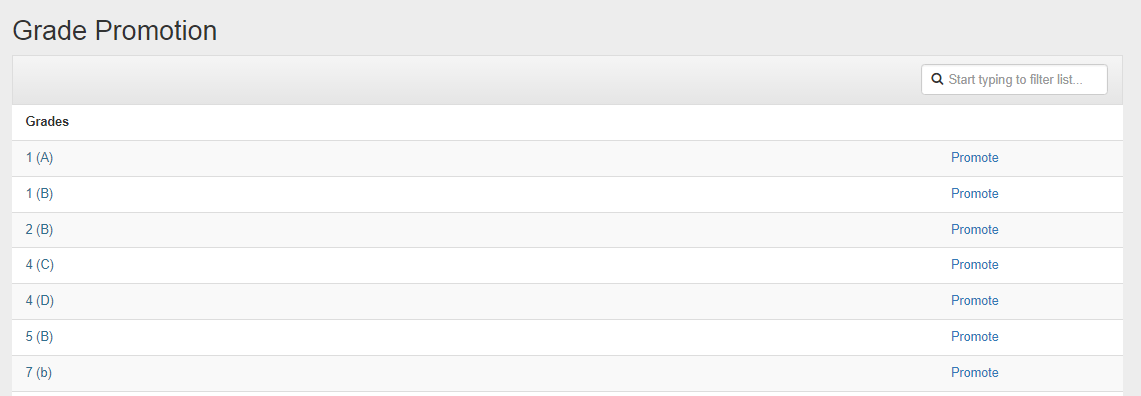
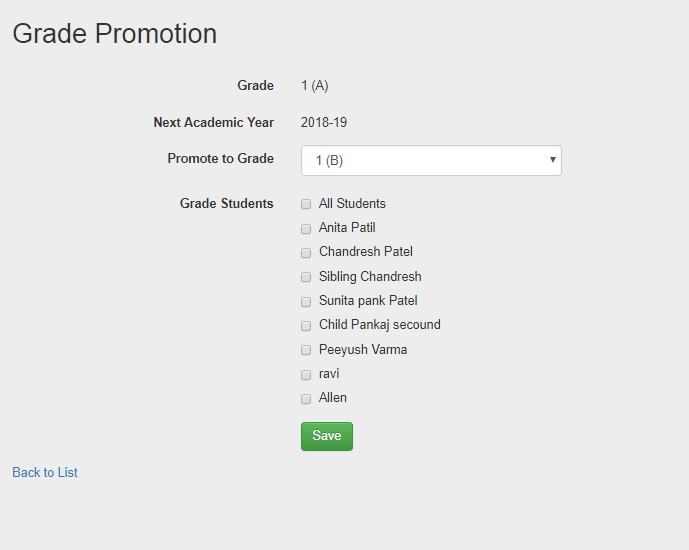
How can I promote the child to the higher grade for next academic year?
Select 'Promote Grade' link from the academic section under My branch. Select 'Promote' option and select new grade for child. Select child name or you can select multiple children. Click on the 'Save'.
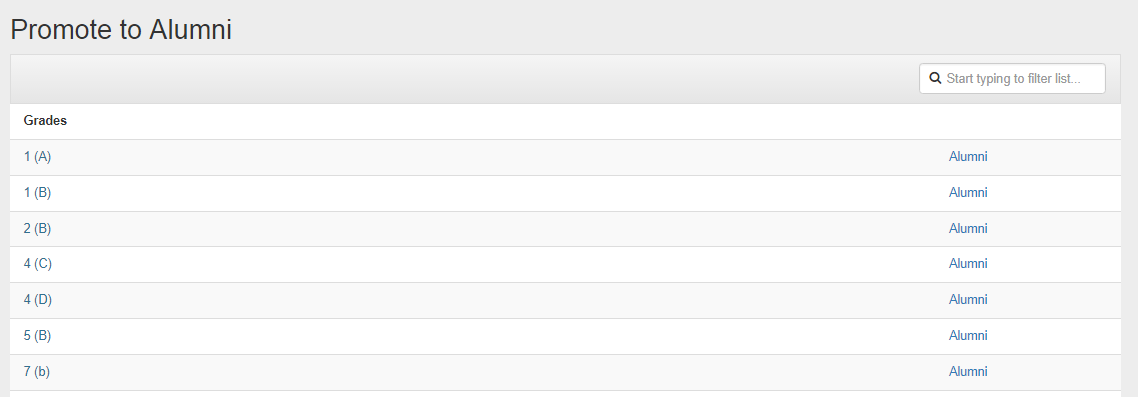
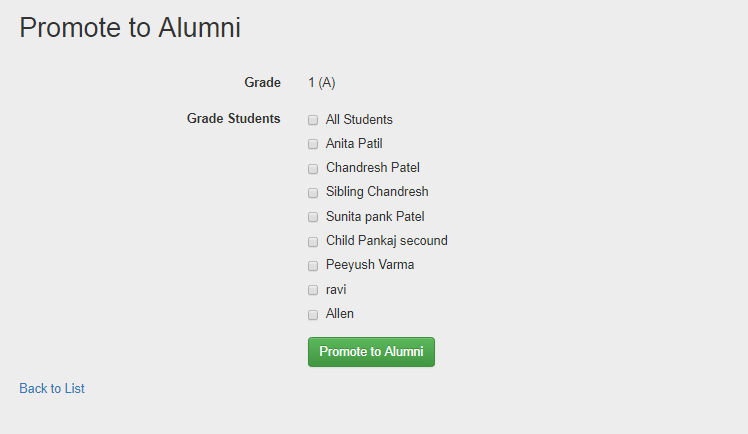
What is the purpose of Promote to Alumni and how can I use it?
Promote to alumni can be use to deactivate IDs of children who have moved out of School. Also it can be used to deactivate only one child from siblings so remaining children will be active. Another use of promote to alumni is the admin can deactivate multiple children IDs from any grade at a one time.
Select 'Promote to Alumni link the academic section under My branch. Select 'Alumni' link and select the child name and click on 'Promote to Alumni' to deactivate the child.
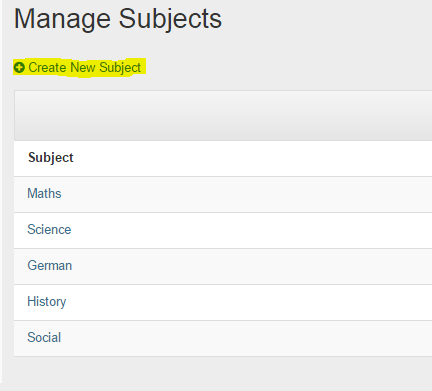
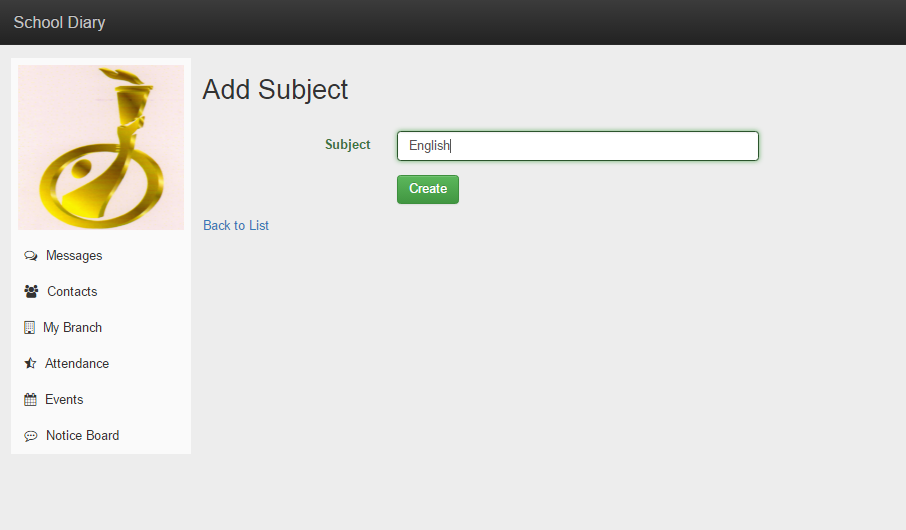
How do I add a Subject or edit an existing one?
To add a subject first click on 'Manage Subjects' link from the academic section under My branch. Click on the 'Create new Subject' then enter a name of subject and click on the 'Create'.
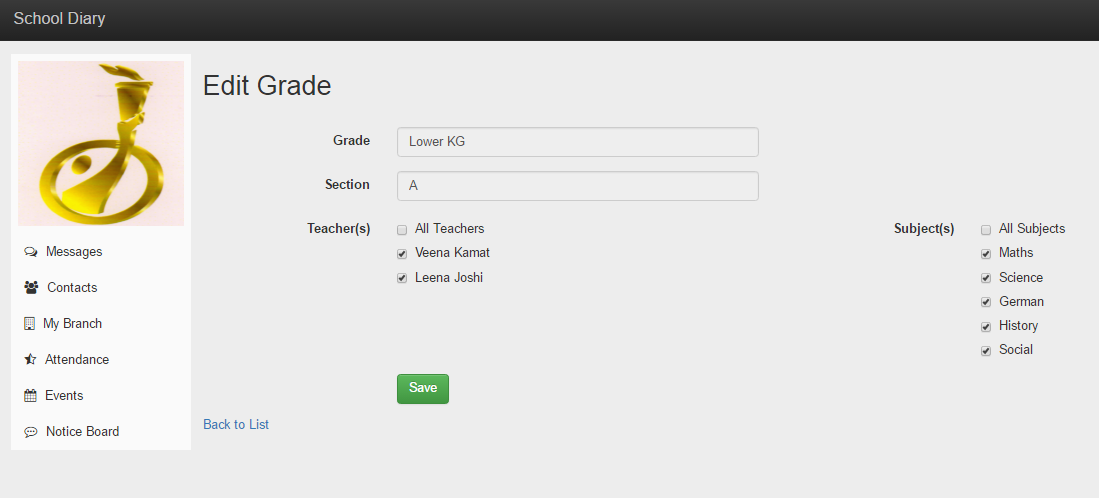
How can I assign subjects and teachers to the grade?
To assign subjects and teachers to a grades click on the 'Grades' link from the academic section under My branch. Click on edit link, select teachers and subjects which you want to assign to the grade and click on 'Save'.
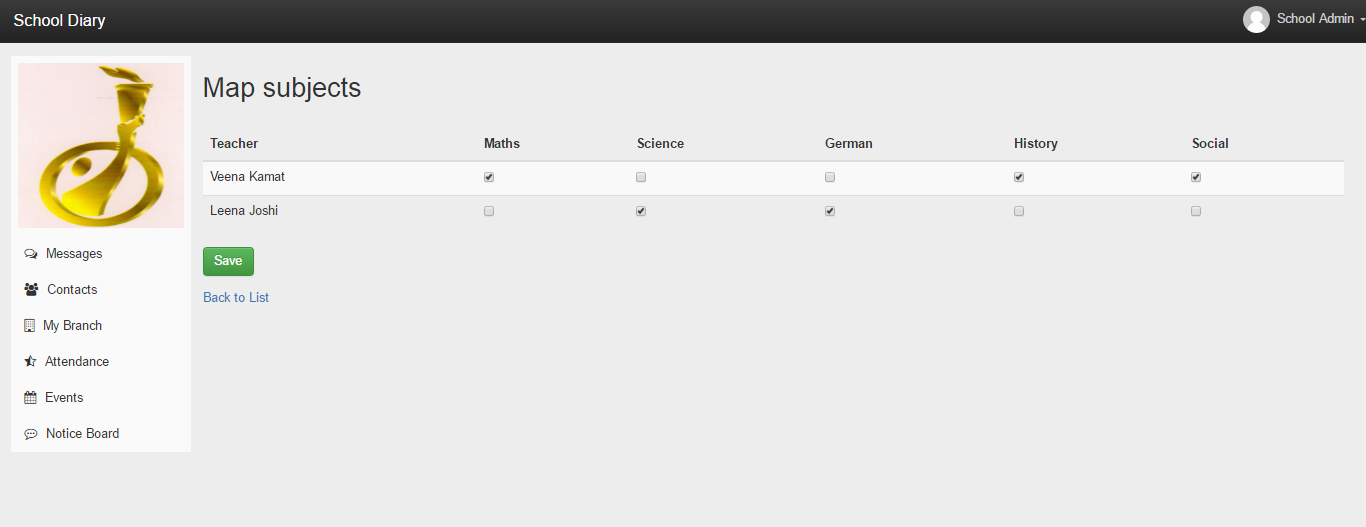
How can I assign teachers to subjects?
To assign teachers to subjects click on the 'Grades' link from the academic section under My branch. Click on 'Assign teachers to subjects', select subjects for each teacher and save.
What is purpose of 'Messages' on My Branch tab?
By using 'Messages' link from the Administrative section under My branch tab you can view all messages received and sent by each school staff.
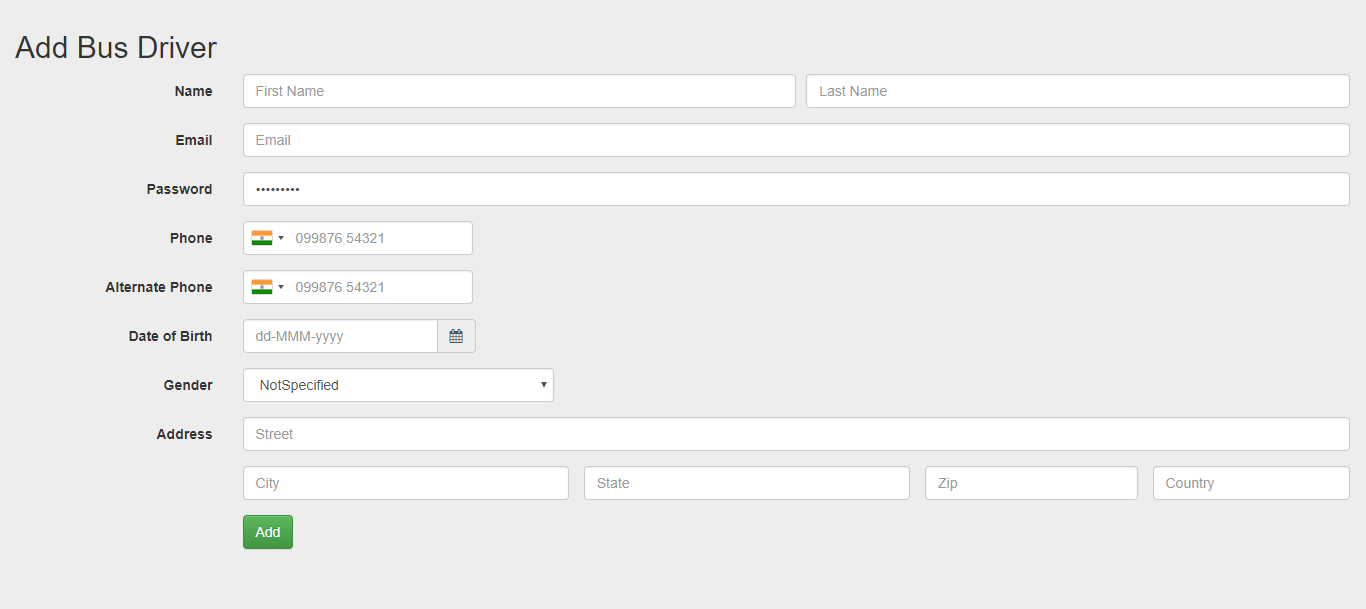
How can I add a Bus Driver?
To add a bus driver select 'Manage Bus Driver' link from the Users section under My branch tab and click on 'Add New'. Fill all the required details of driver and Click on 'Add' to save. (Admin can set driver's mobile number as default password)
How to edit or update information of Bus Drivers?
Search the Bus driver by using 'Search User' tab. You can search the drivers by registered mobile number, first name, last name or email address. Click on 'Edit' link to update the information and 'Save'.

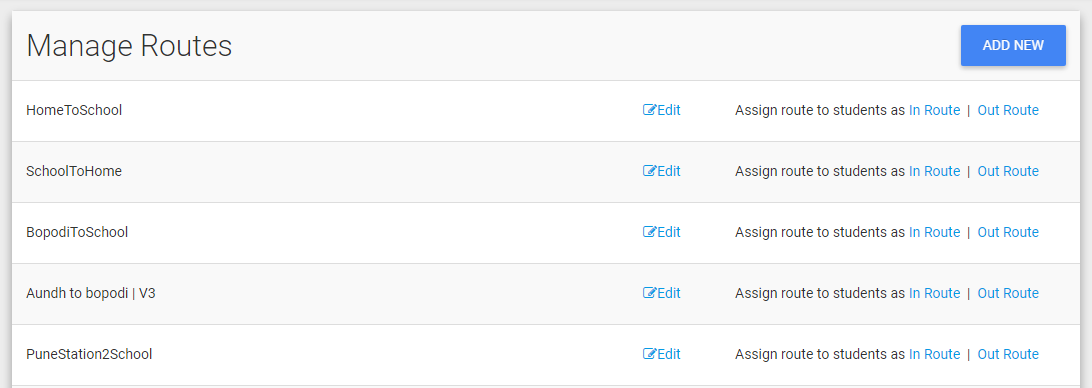
How to create a route?
Select 'Manage Routes' link from the Administrative section under My branch tab; menu and click on 'Add New'.
Enter suitable name for route (Ex. IN-Bus 1| 9.00 | Shivaji Nagar to School). Enter all the required details and click on 'Save'.
![]()
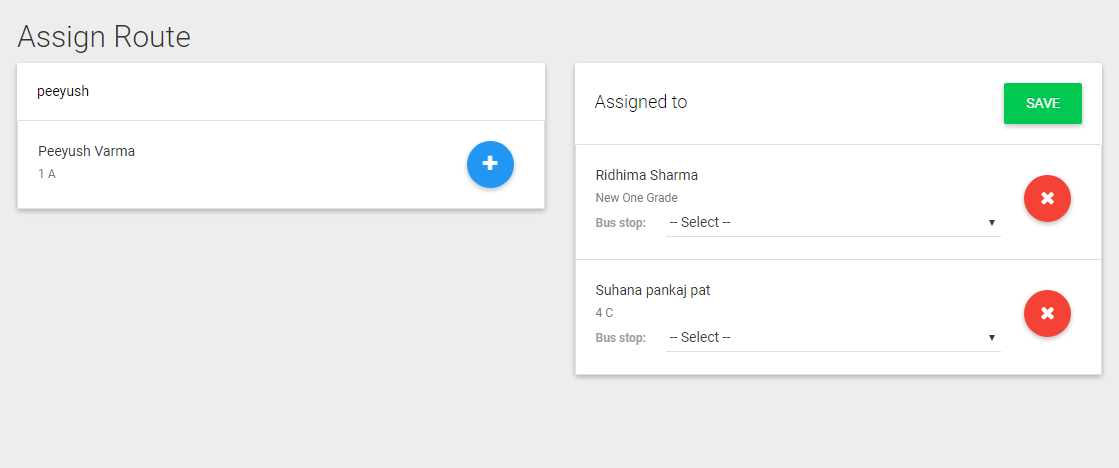
How to assign In-route and Out-route to the child?
In-Route means the route bus takes while bringing the children to school. Out-Route means the route bus takes while dropping children from the School.
To assign In-route and Out-route for a child, select 'Manage Routes' link from the Administrative section under My branch tab. Every route name has In-route and Out-route option, by routes names admin can differentiate whether it is In-route or Out-route. So assign In-route to the child select 'In-route' option. Search the child by using the Assign Route filter and click on plus sign to assign the route. Click on 'Save' to save the changes. All children already assigned to the route will also appear here.
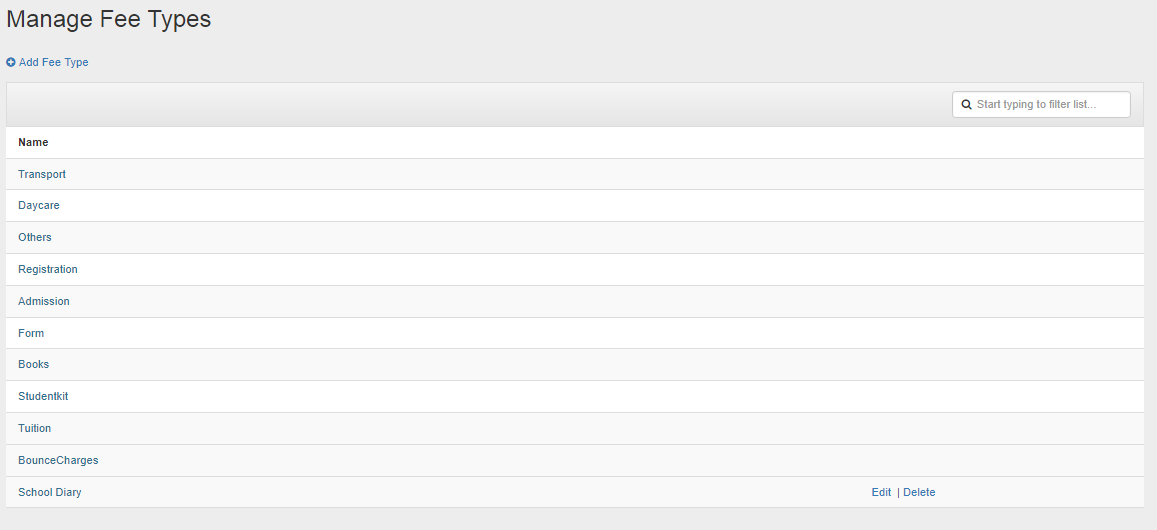
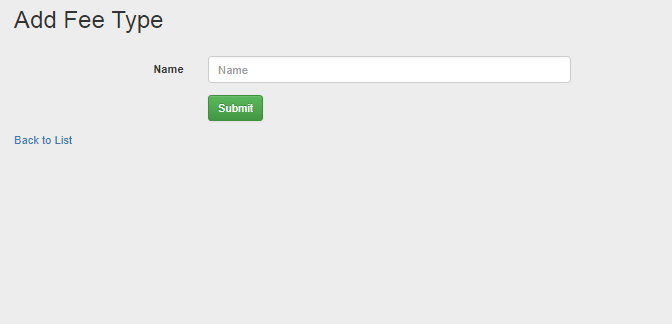
What is fees type and how can I use it?
There are several common fee types used by schools. We have already created some fees type (ex. Registration, Tuitiion, Transport etc.). Admin can also create a new fees type by using 'Manage Fees Type' link from the Administrative section under My branch tab. Select 'Manage Fees Type' link and click on 'Add Fees Type' and enter the name of fee type. Click on 'Save' to save the fees type.
What is the purpose of Fees Template?
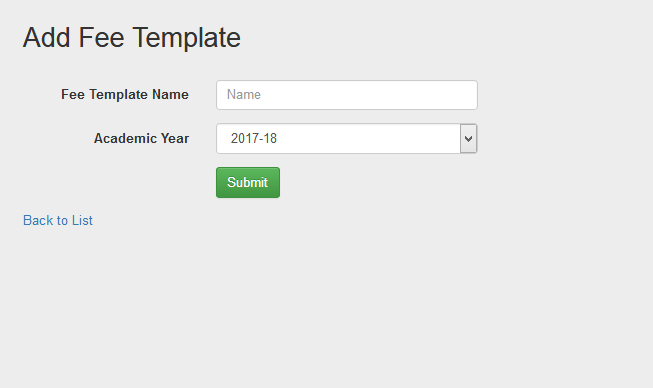
Admin can use a Fees Template to easily apply fees to multiple children or multiple grades at a time. To create a fees template select 'Manage Fees Template' link from the Administrative section under My branch tab. Select 'Create Fees Template' and give a suitable name to the fees template, select an academic year and 'Submit'. Admin can also create a fees template for next academic year.
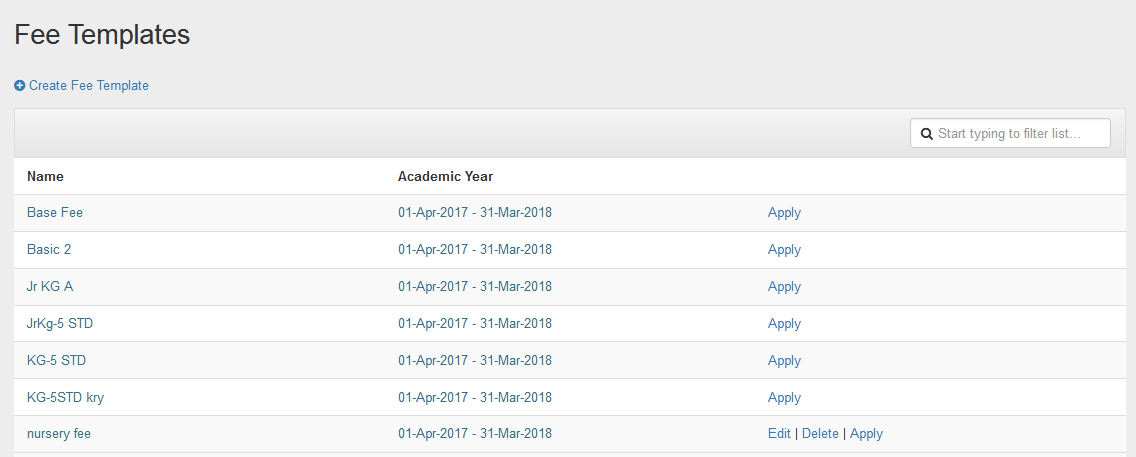
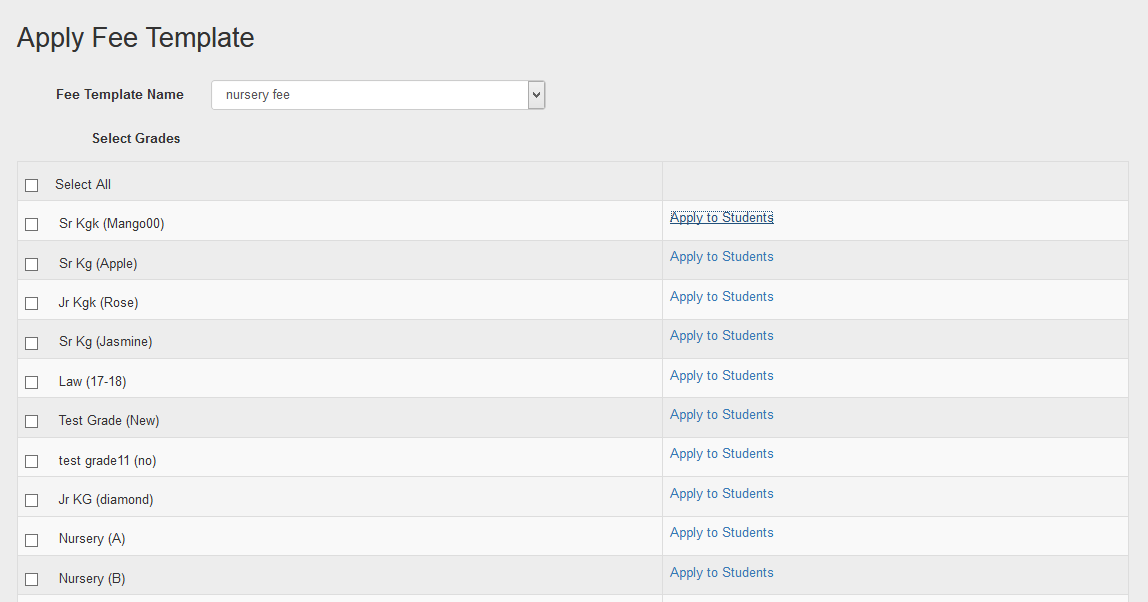
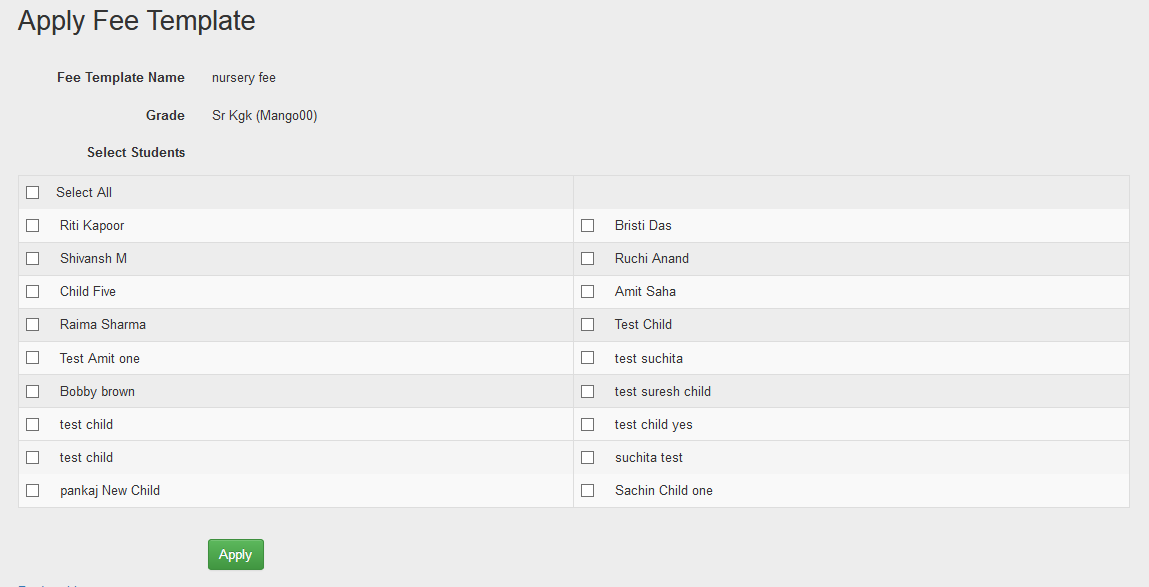
How to apply fees template to grades or children?
Create a new fees template and select 'Apply' link. Admin can apply the template to multiple grades or to multiple children from any grade. Admin cannot edit or delete the fees template once it is applied to any grade/student.
How can I apply fees to the individual child?
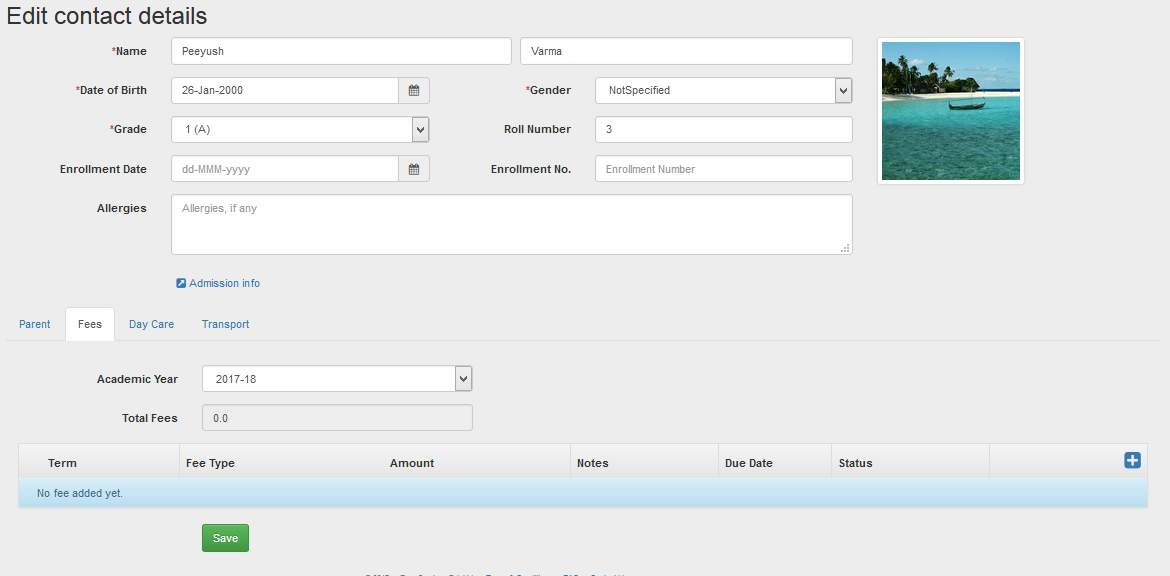
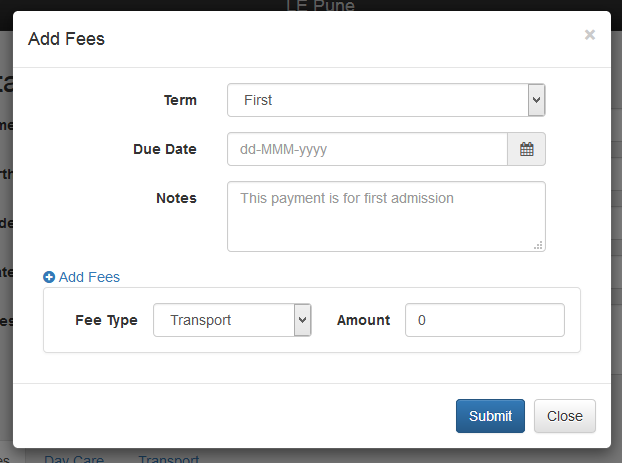
Search the child by using 'Search User' menu. Click on 'edit' link and then open 'Fees' tab. Click on '+' sign to add a new entry. Select term and enter all required details. Admin can add another fees entry for selected term by using 'Add Fees' link. Click on 'Submit' to save the fees entries. Click on 'Save' to save all the fees details.
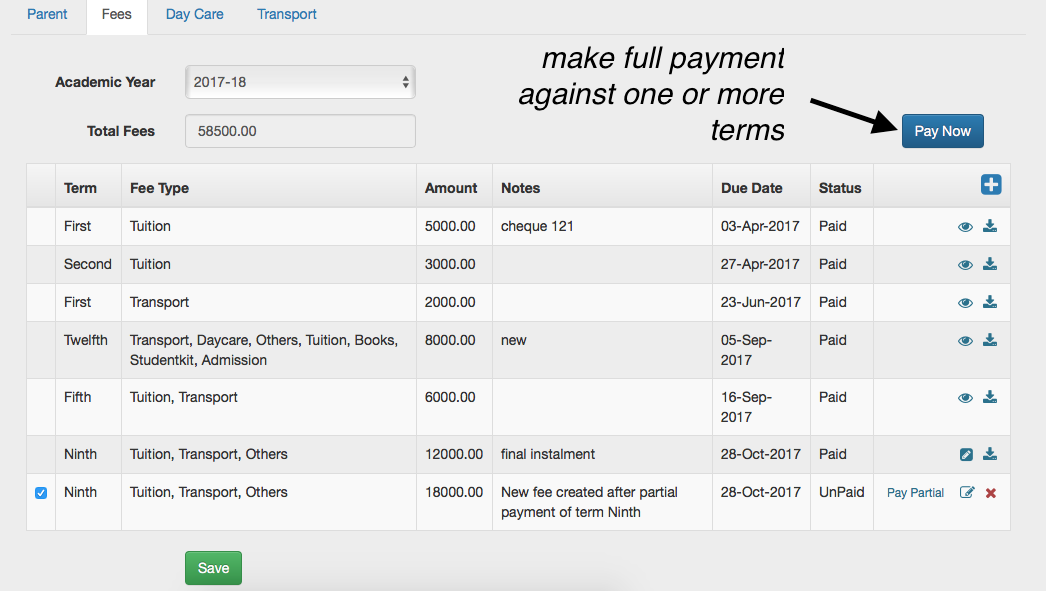
How can I update the paid fees?
To update the paid fees, first search the child and click on 'edit' link. Open fees tab and select the fees entry which you want mark as paid. Click on 'Pay Now' button. Enter all required details and click on 'Pay'. Admin can also mention the partial payment details by using 'Partial Pay' option.

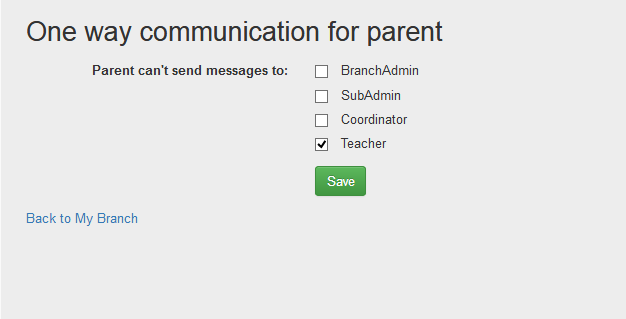
What is the purpose of 'One way communication'?
By using one way communication, admin can decide the staff roles with whom parent can communicate. Select 'One way communication' link from the Administrative section under My branch tab. Select staff role and click on 'Save.
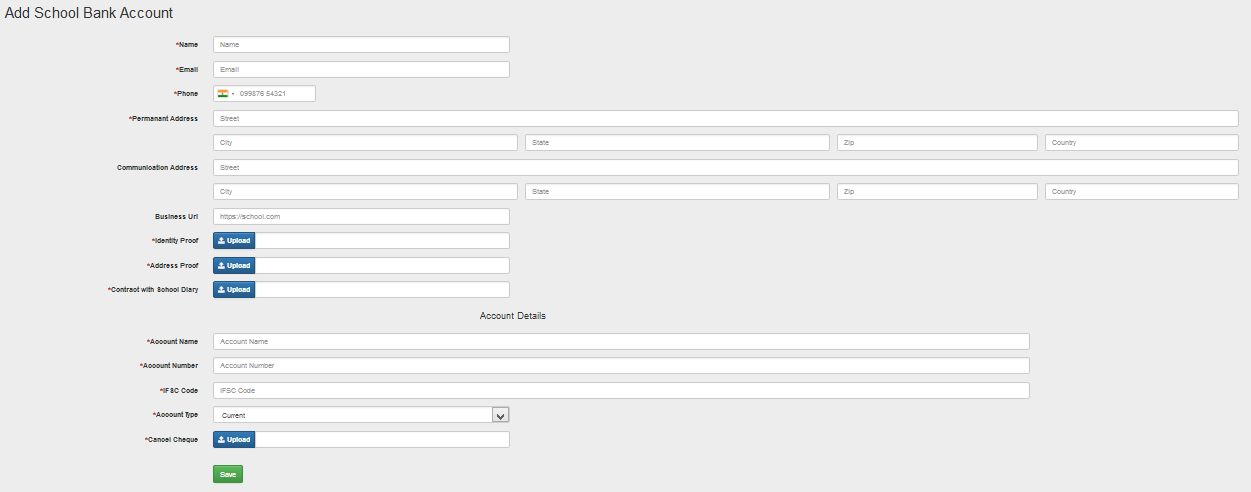
How can I add School Account details for online payment facility?
Select 'School Bank Account' link from the Administrative section under My branch tab. Click on 'Create School Bank Account' link. Fill all required details. Upload scan copies of required proofs and click on 'Save'.
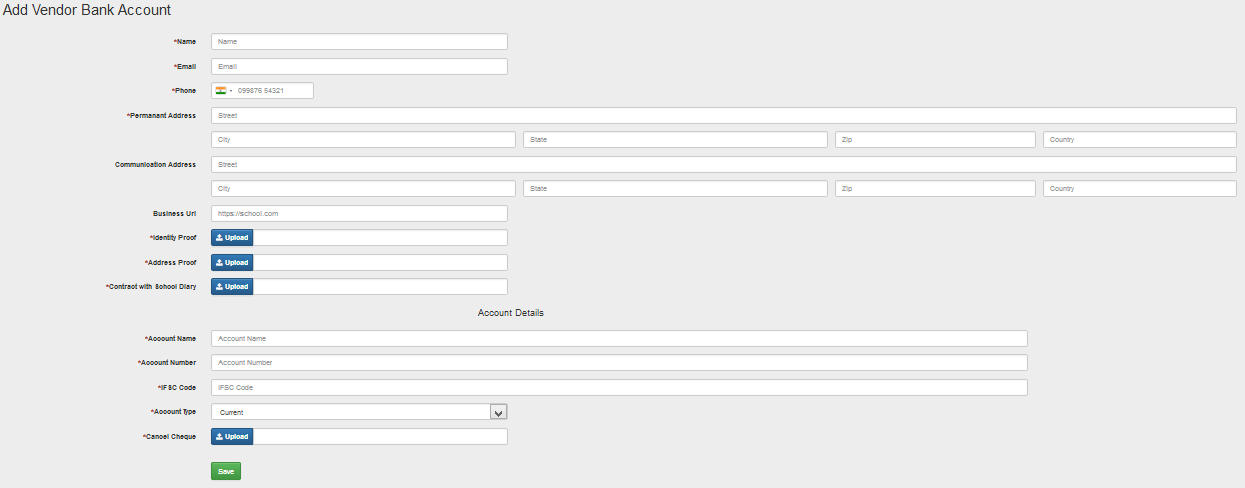
How can I add Vendor Bank Account Details?
Select 'Vendor Bank Account' link from the Administrative section under My branch tab. Select 'Create Vendor Bank Account' link to add a new Vendor's bank details. Fill all required details and upload scan copies of required proofs and click on 'Save'.
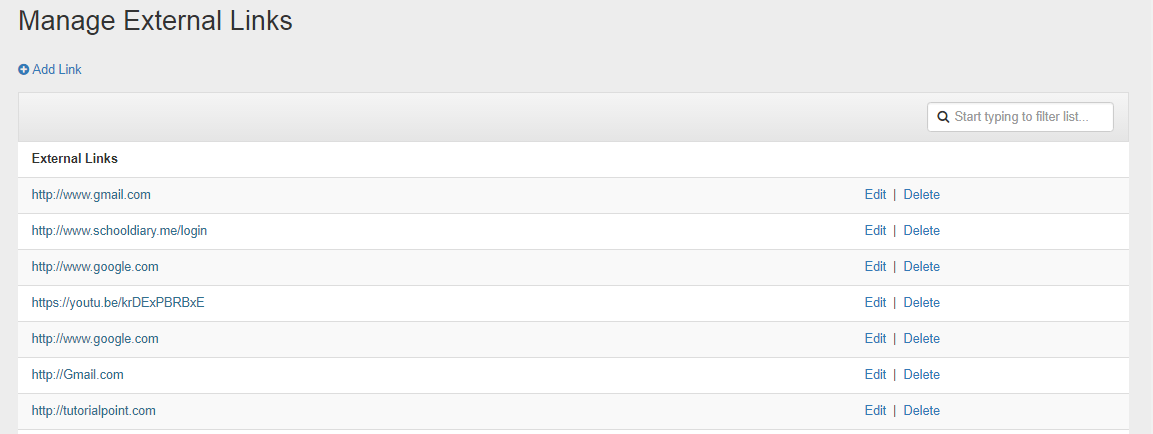
What is the purpose of Manage External Links?
Manage External link is to share some specific school links (for ex. Video Link, Websites Link) with the parents.
Select 'Manage External Link' link from the Administrative section under My branch tab. Click on 'Add New' link. Enter the link and description and 'Save.

Events
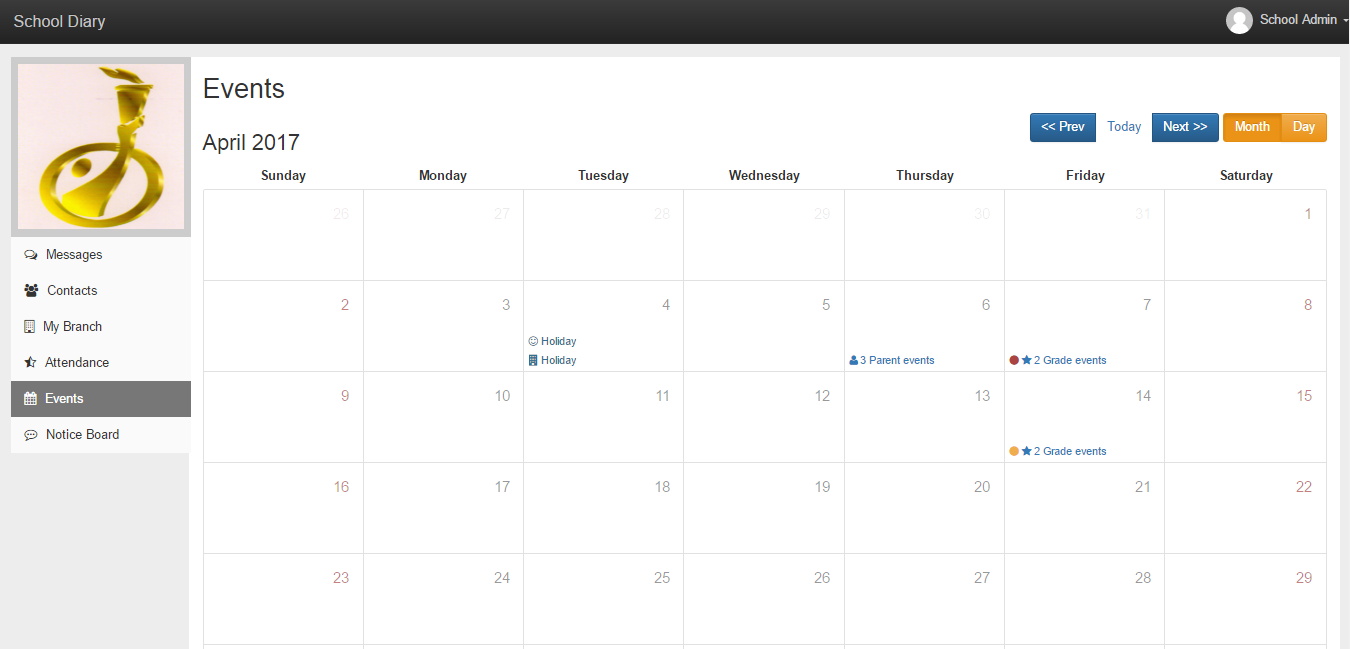
What is an Event ?
Every school has some activitiy/functions/events that happen daily at School or class level. These activities are shared with parent using circular or school calendar. Event is the digital form of that calendar.
How can I create an Event?
To create an Event click on the 'Event' tab on the main menu. Once you are in the Event module, hover over a date for which you want to create an event and click on the '+' icon. On the popup, choose event type (school/class/staff/parent), end date for the event, enter description for the event and click on the 'Create Event' Select holiday check box if its a holiday event.
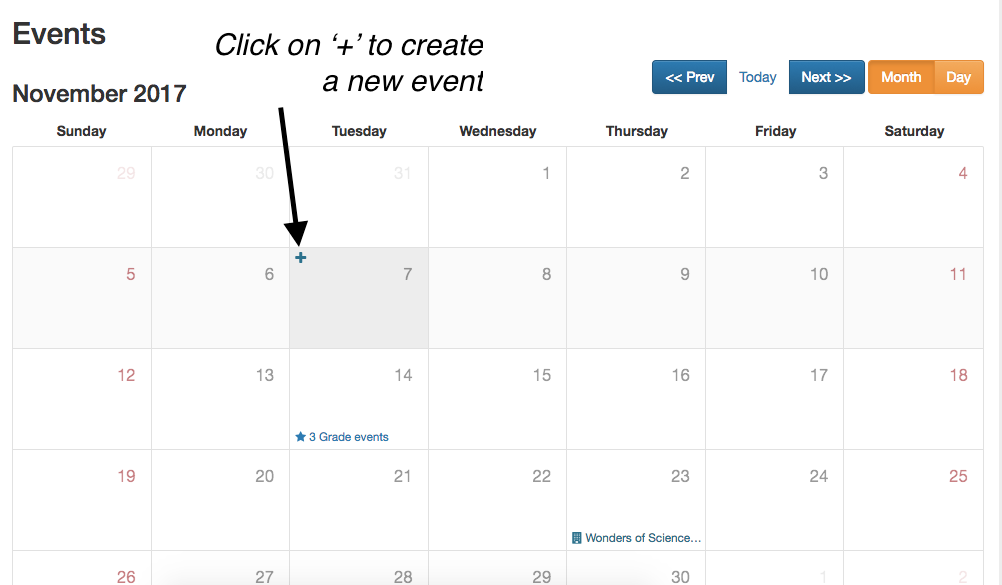

For grade events, choose appropriate grades for which the event is applicable. For parent event choose specific parents for whom you to create the event.
School event is visible to all parents/staff/tecahers/admins in the school. Grade event is only visible to the parents/teachers of that grade. Staff event is visible to only staff members (teachers/admin) while parent event is visible only to selected parents.
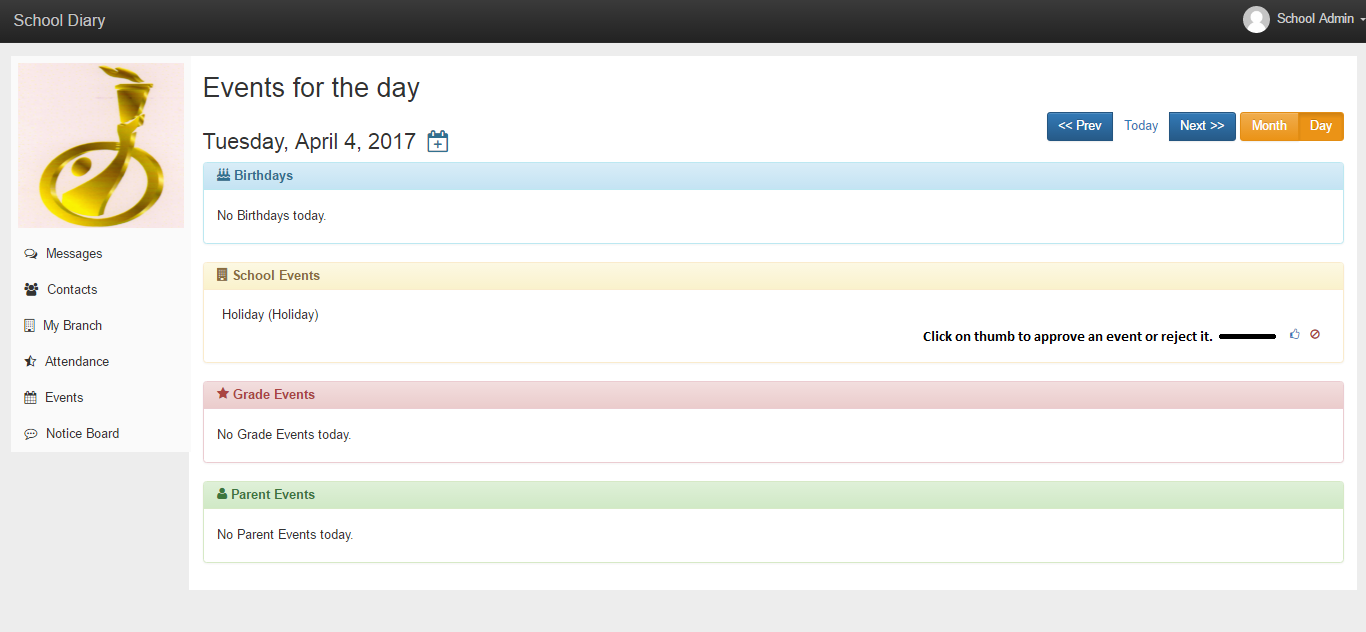
How can I approve or reject an Event?
Event name followed by yellow dot is considered as pending for approval. To approve that event click on specific event and click on the 'Thumb' symbol placed in front of that event. Events name followed by red dot are the rejected events.
Notice Board
What are the features of Notice Board?
Notice Board is the easiest way to share information with the parents.
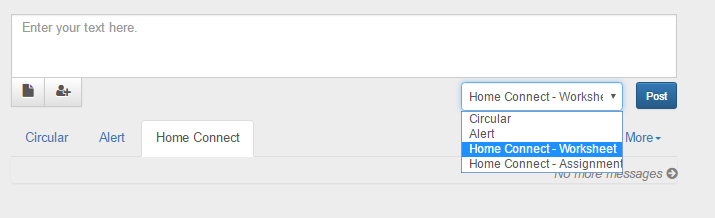
By using the notice board you can send a message/document/picture/podcast to the whole school, one/multiple grade(s) or to all teachers in one go. You can send a message as a news, alert, circular, home connect and also can attach up to 10 images/PDF/MP3 (total file size of 10mb) in one shot.
How can I send a notice through the Notice Board?
To send a notice, click on the appropriate notice board (class/school/all teacher) you want to send message on. Once in, enter your message into the message box and/or attach files. You can also select more notice boards as recipient by clicking on the human icon below the text box, select the notice type and click on the 'Post' button.
How can I approve or reject the notice?
Only Admin and Teacher Coordinator can approve or reject a notice. To see all the posts pending approvals click on the 'More', and then click on the 'Pending for approval'. To see all the rejected and approved notices click on the 'Rejected' and 'Approved' links respectively.
Once you get the list of all pending notices you can approve or reject those notices by clicking on the specific approve/edit/reject link. You can also edit by using edit link.

Attendance
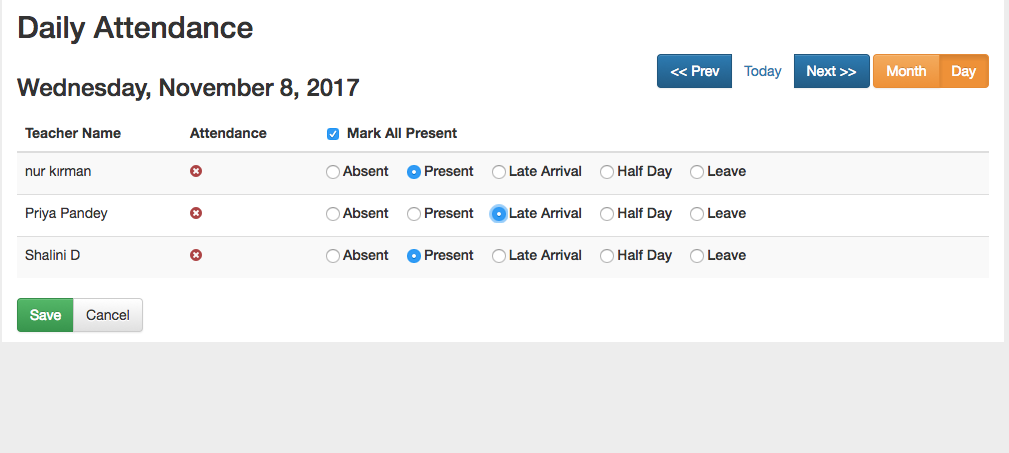
How can I use the Attendance module?
Select 'Attendance' tab from left side menu. There are 3 options for attendance.
1.Grade Attendance.
-
Teachers Attendance.
-
Driver Attendance.
Refer below description for 3 options for attendance.
Grade Attendance
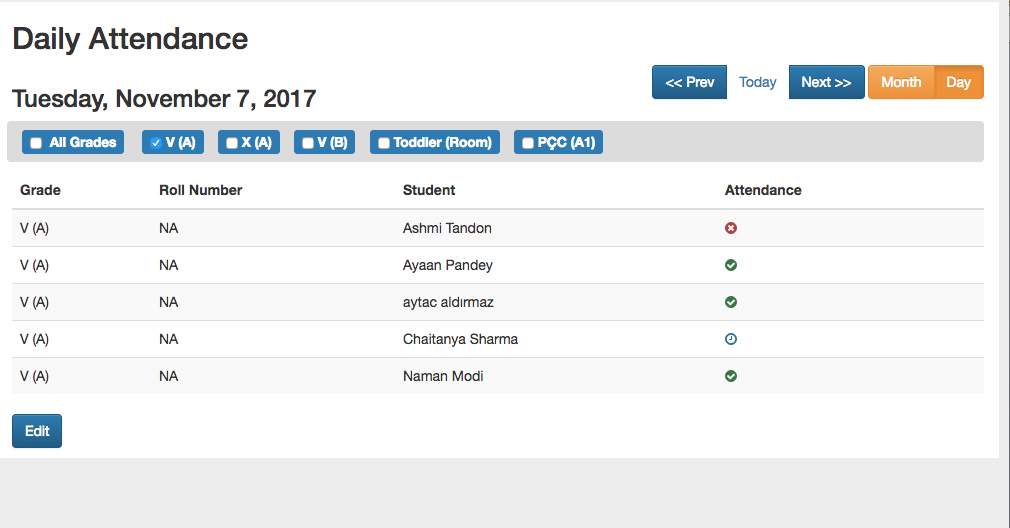
Teacher will be able to see only assigned classes, while admin will be able to see all the classes. Select particular class name and select the date to take the attendance. Click on the 'Edit' button. There are five (5) attendance options (Absent, Present, Late Arrival, Half day, Leave) available to mark the status of attendance. Select attendance status for each child and click on the 'Save'.
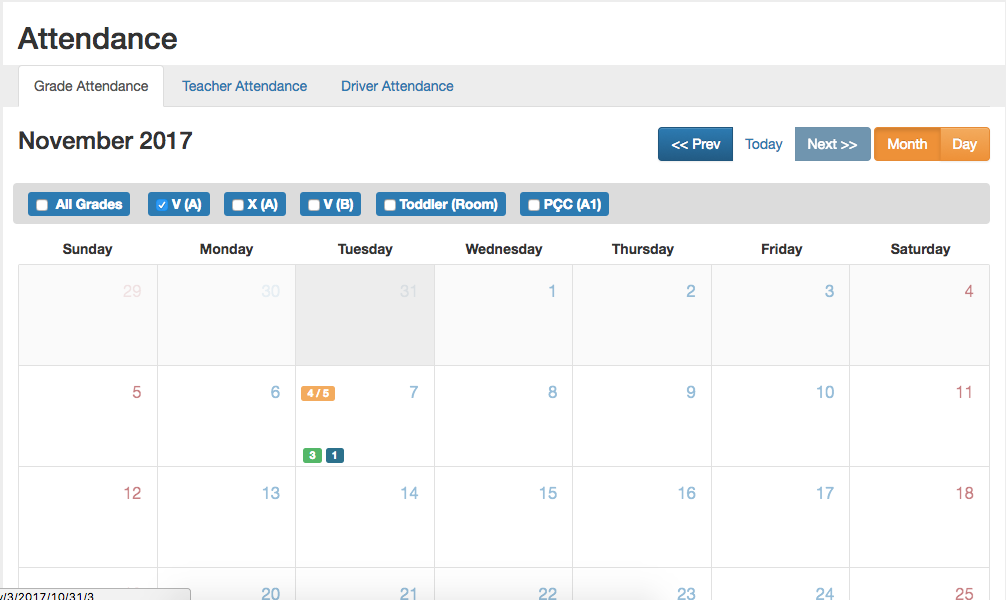

Tip: You can mark all students as present using the 'Mark All Present' check box.
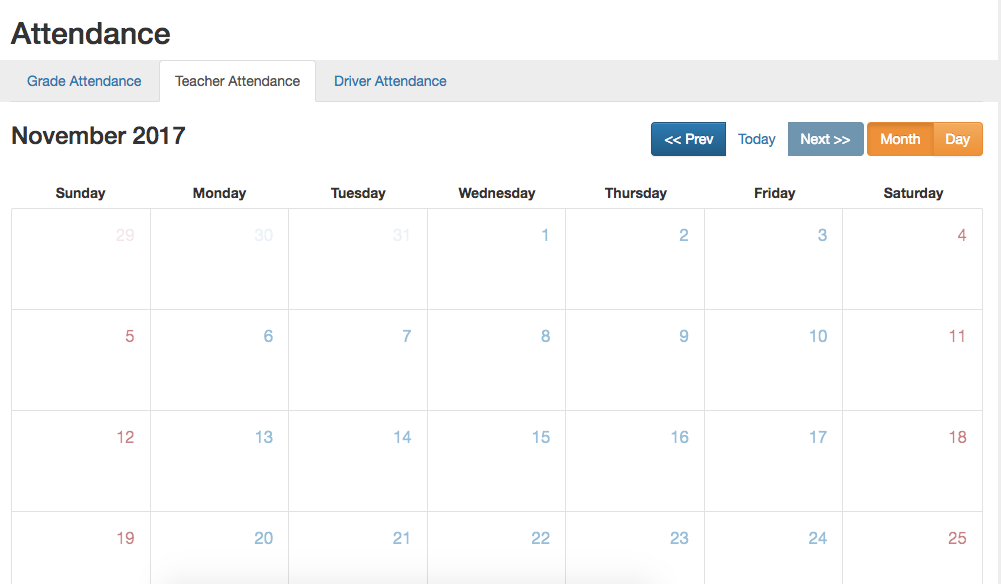
Teacher & Driver Attendance
Only admin will see the option to take teacher & driver attendance. To take attendance of teachers go to attendance module and click on Teachers Attendance tab on the top row. Click on the 'Edit' button. There are five (5) attendance options (Absent, Present, Late Arrival, Half day, Leave) available to mark the status of attendance. Select attendance status for each teacher and click on the 'Save'.
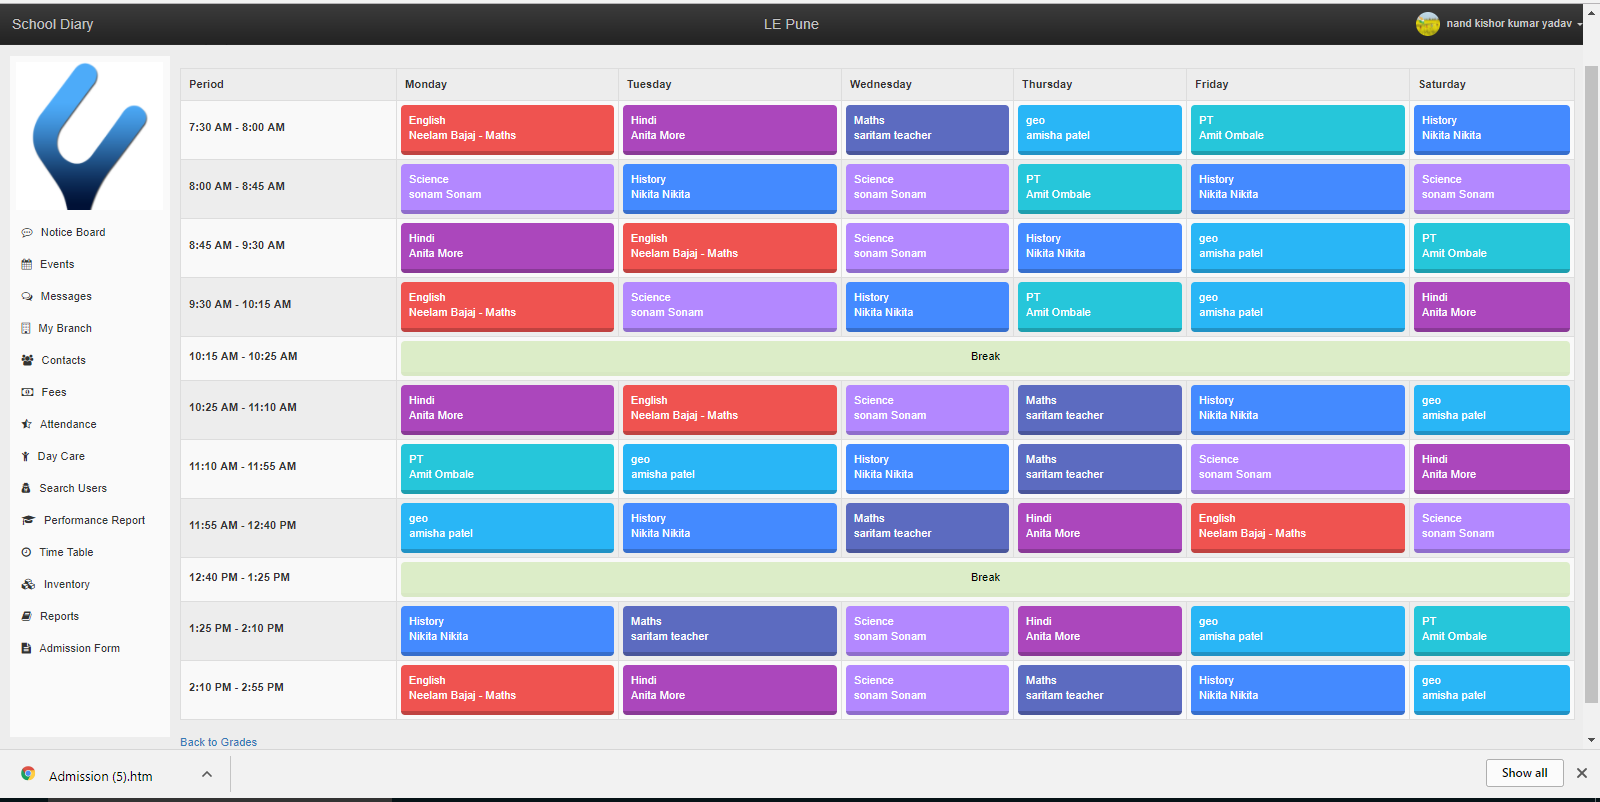
Time Table
How can I create a Time Table?
To create a Timetable please follow the steps below-
Step 1 - Add all subjects to the School Diary.
- Please refer to "How do I add a Subject or edit existing one?" section
Step 2 - Assign subjects and teachers to all grades.
- Please refer to "How can I assign subjects and teachers to the grade?" section
Step 3 – Assign subjects to teacher.
- Please refer to "How can I assign subjects and teachers to the grade?" section
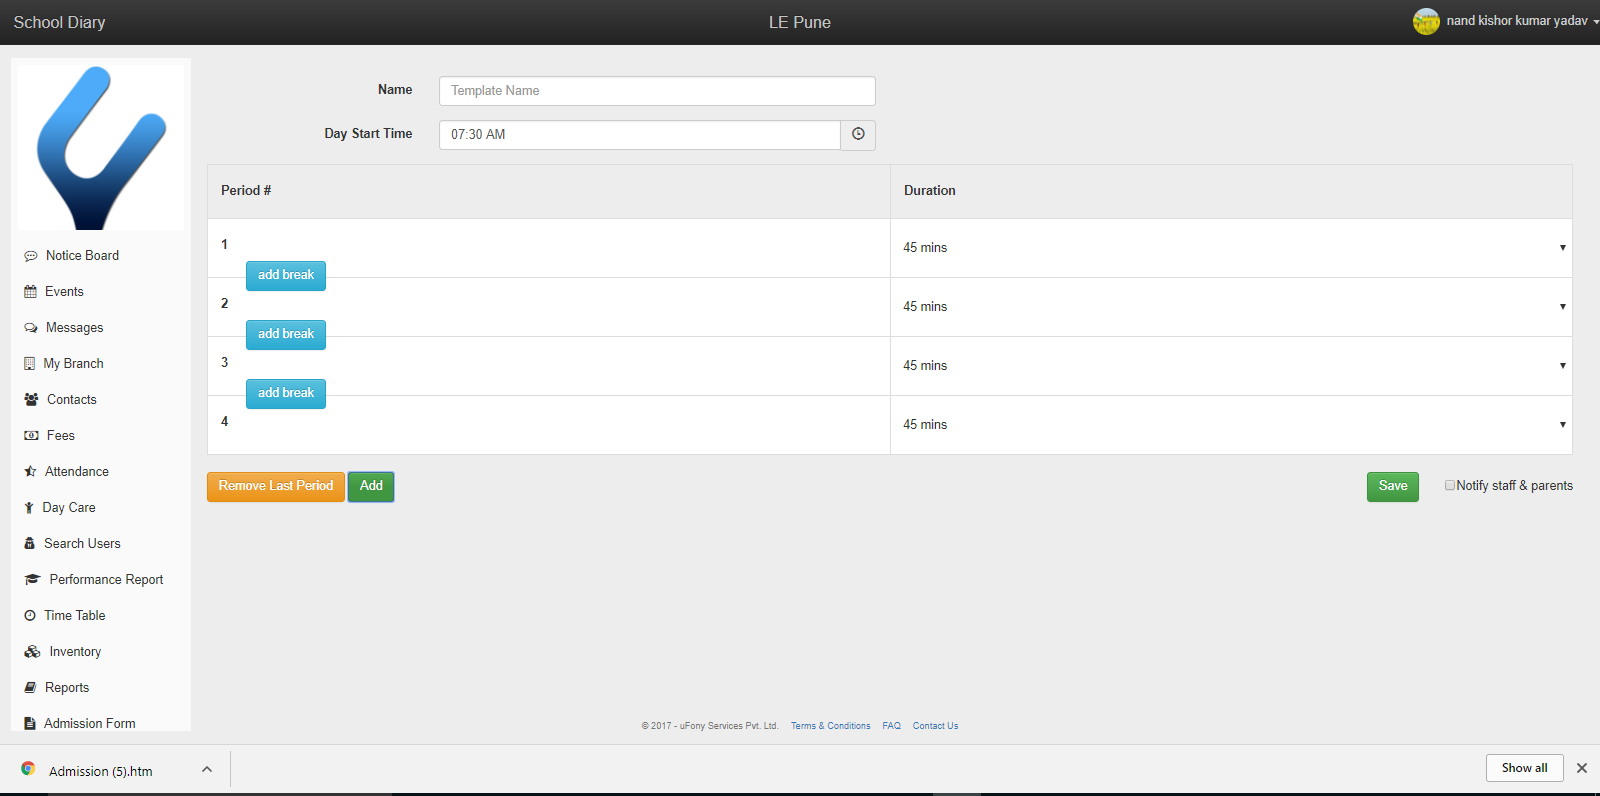
Step 4 – Design a Time Table format according to period and breaks timing.
–Select 'Time Table' tab from left side menu bar
–Click on 'Edit Periods' link.
–Design the Timetable format. (Different Timetable formats can be designed for different class/grades.)
–Click on add period to add a new period. You can choose duration for each period separately.
–Click on the break button to add a break between two periods. You can choose duration for the break
–Remove last period button can be used to remove extra periods
–Click on 'Save' to save the changes. Click on notify option on bottom right to update parents after the changes
–You can select any number of periods, breaks and their duration.
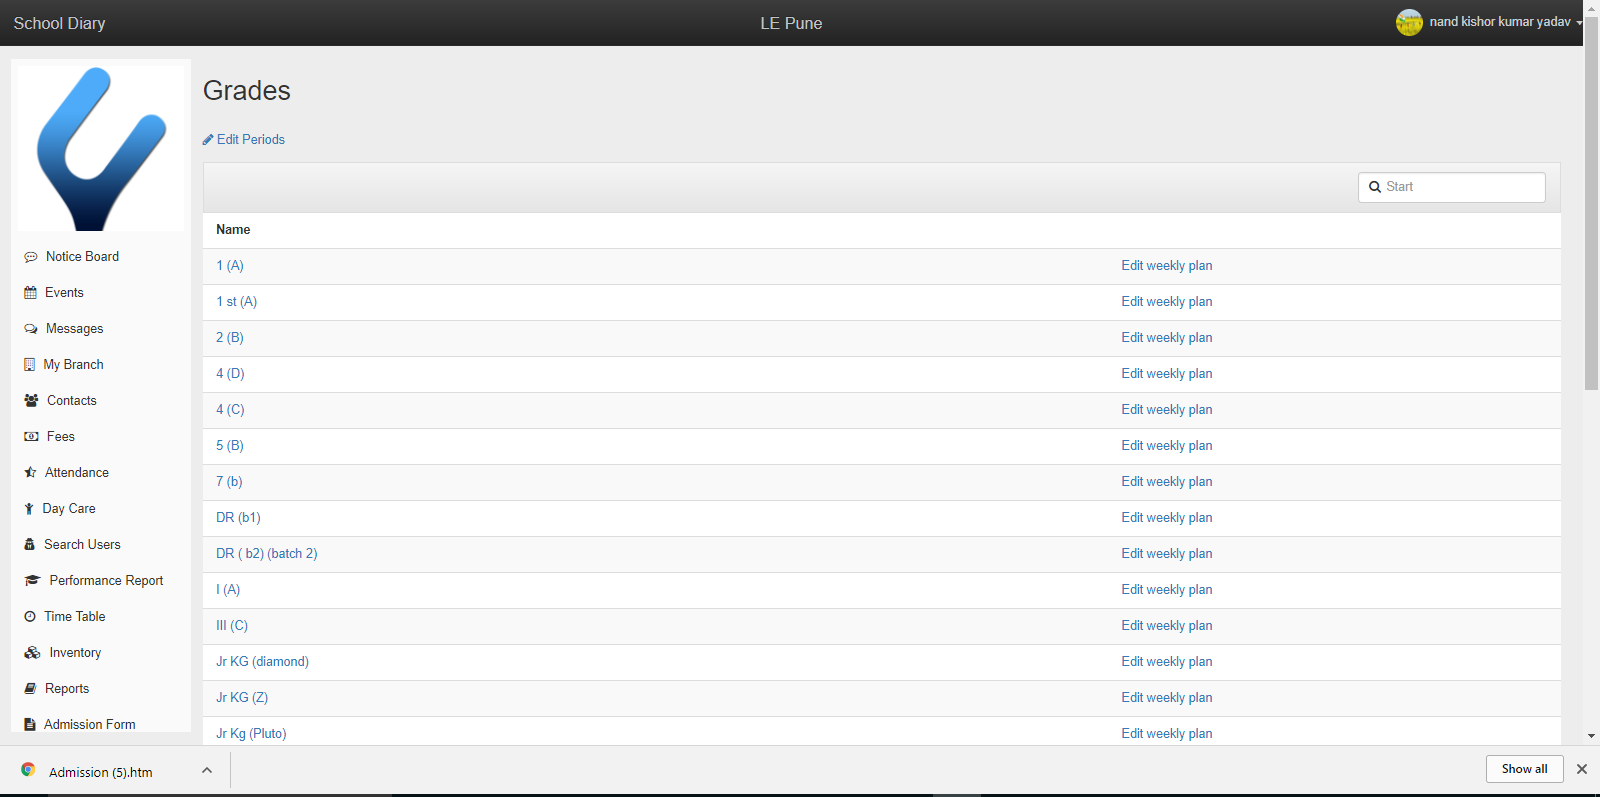
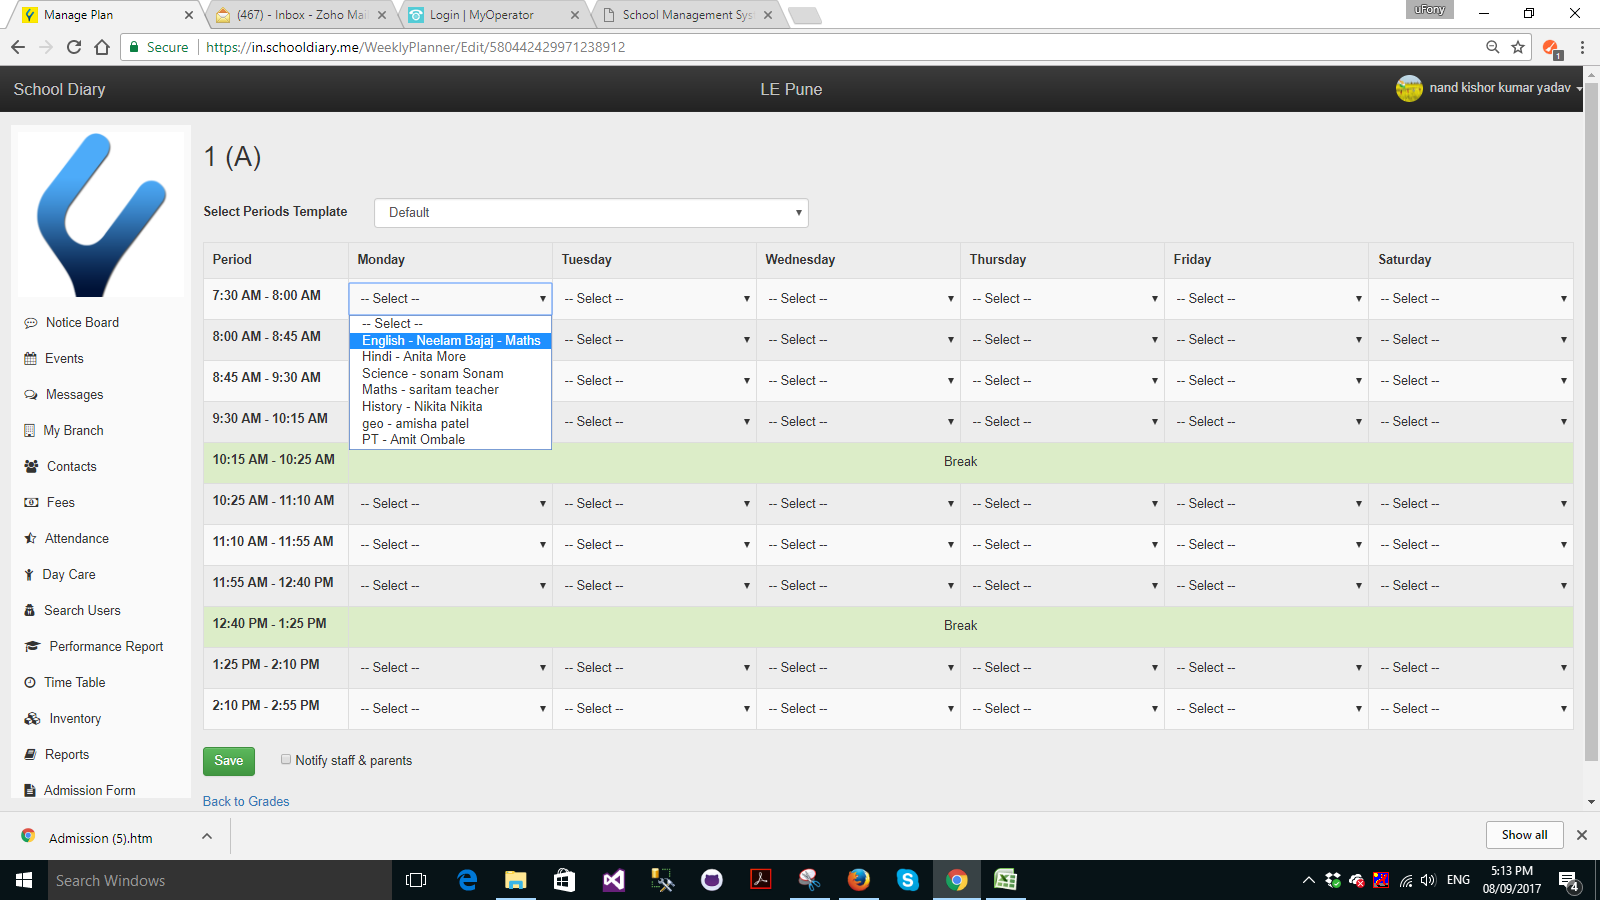
Step 5 - Create a Timetable for each grade.
- Select 'Edit weekly planner' link.
- Select designed format for selected grade.
- Assign subject name & teacher name for each and every period slot.
- Click on 'Save'
Inventory
What is the purpose of Inventory module?
Inventory system will help schools to keep track of daily goods such as stationary, books, chemicals etc.
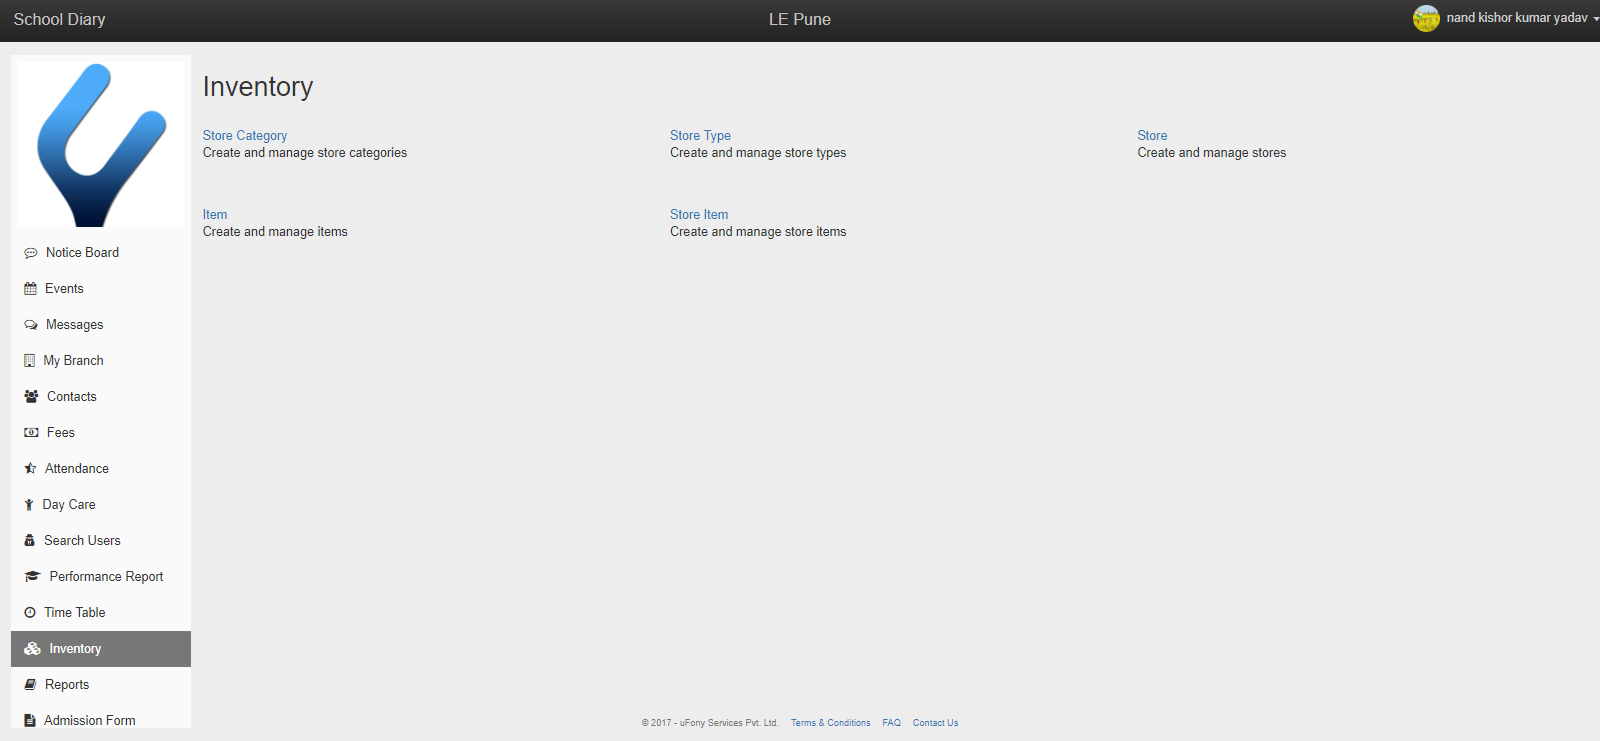
What is Store Category & Store Type ?
Store category is based on the type of items stored in that store. For example – cloths can be one store category, books can be another.
Store type denotes whether it is a central store or for specific branch/department. For example, school may have a central store for storing stationary and each department (maths, science etc) may have its own store for stationary. Smaller schools can just manage fine with one Central Store Type.
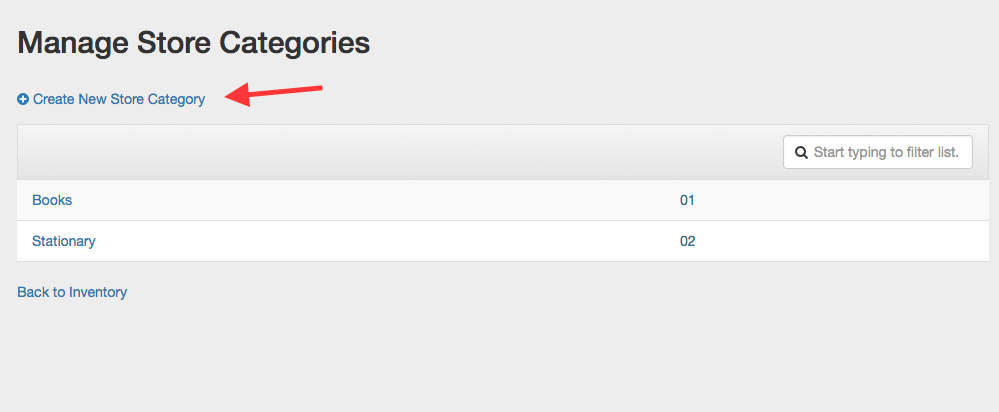
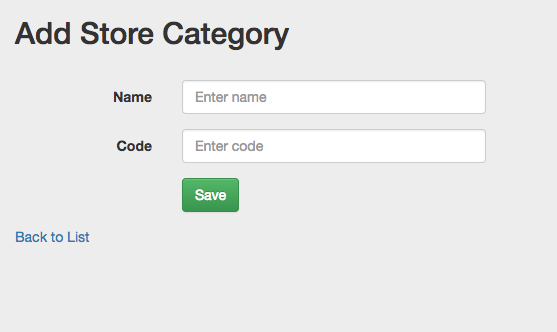
How can I create a store category?
To create a store category select 'Inventory' tab from left side menu list. Select 'Store category' link and click on 'Create New Store Category' to create a category. Enter a category name and category code and click on 'Save'.
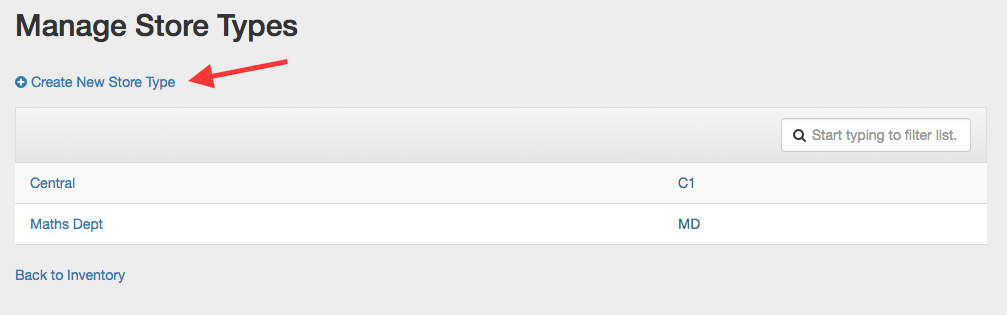
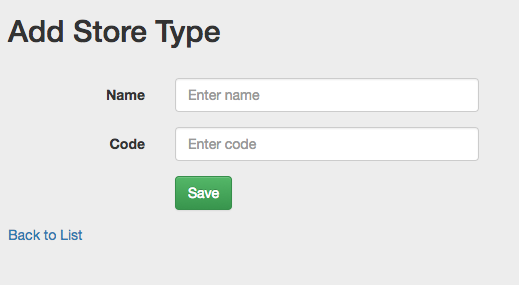
How can I create a new store type?
Select 'Store type' link from Inventory menu. Click on 'Create New Store Type' to create a new store type. Enter a store type name and code and Save.
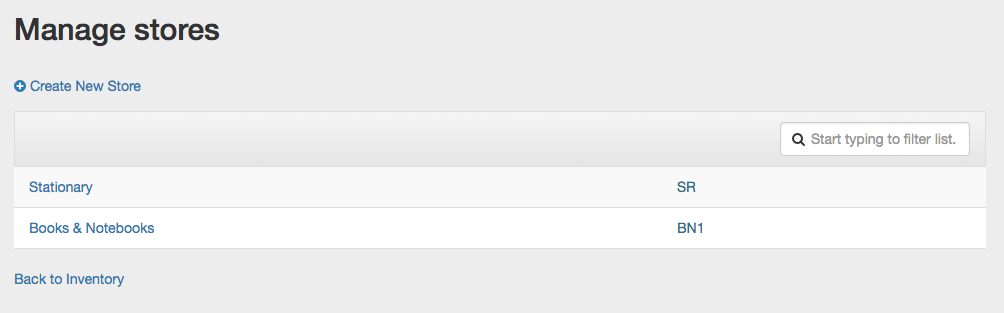
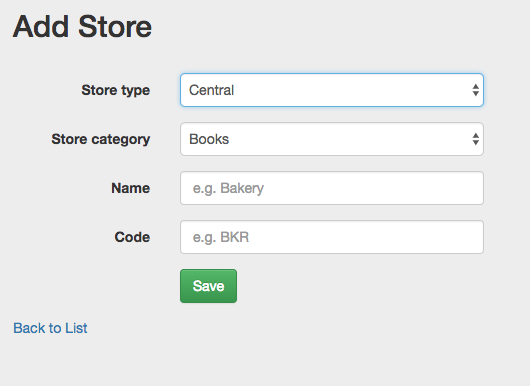
How can I create a new store?
Select 'Store' link from Inventory menu. Click on 'Create New Store' to create a new store. Select the store type and category. Enter a store name and code and Save.
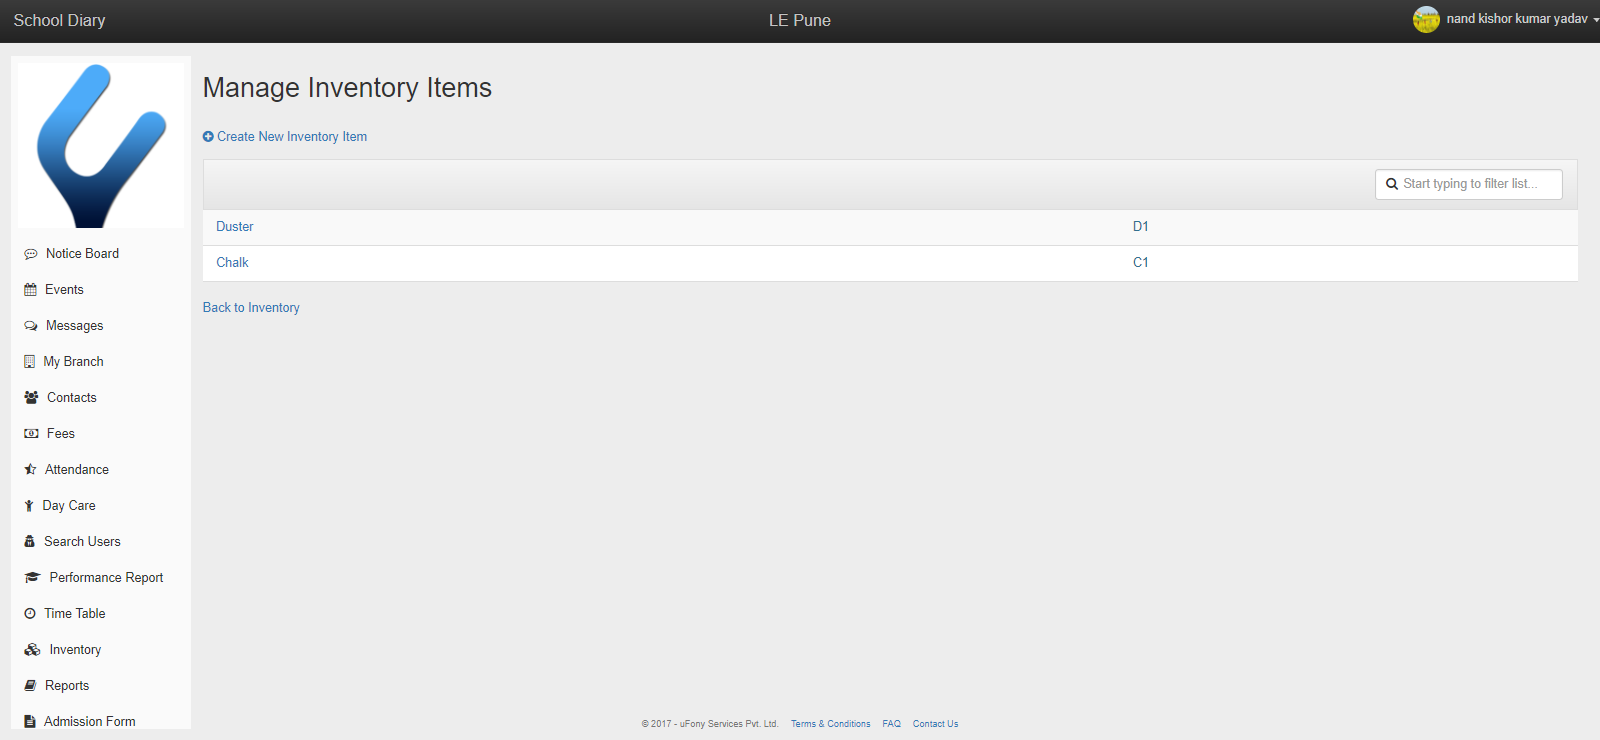
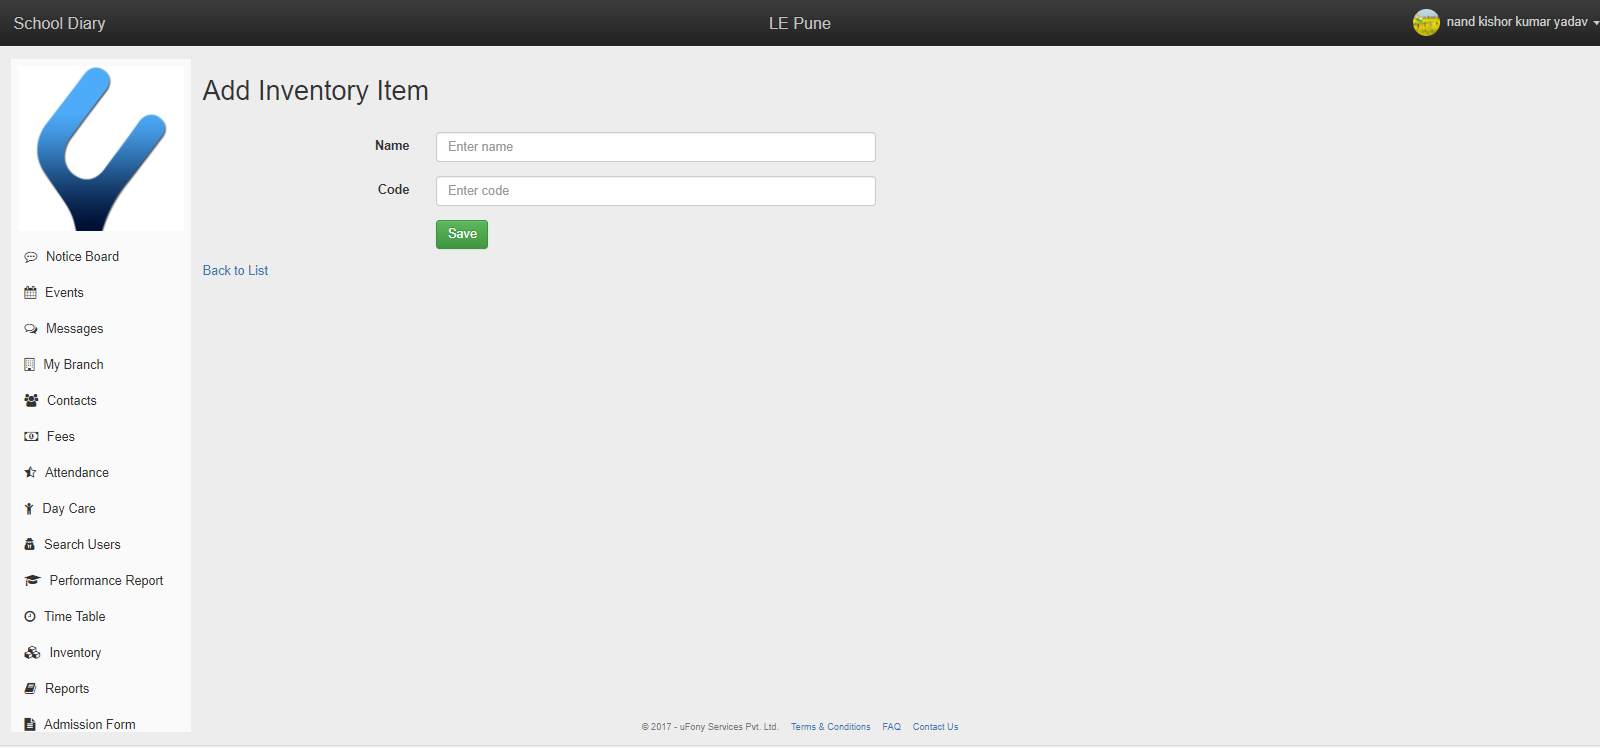
How can I add a new item?
Select 'Item' link from Inventory menu. Click on 'Create New Inventory Item" to create a new inventory item. Enter an item name and code and Save.
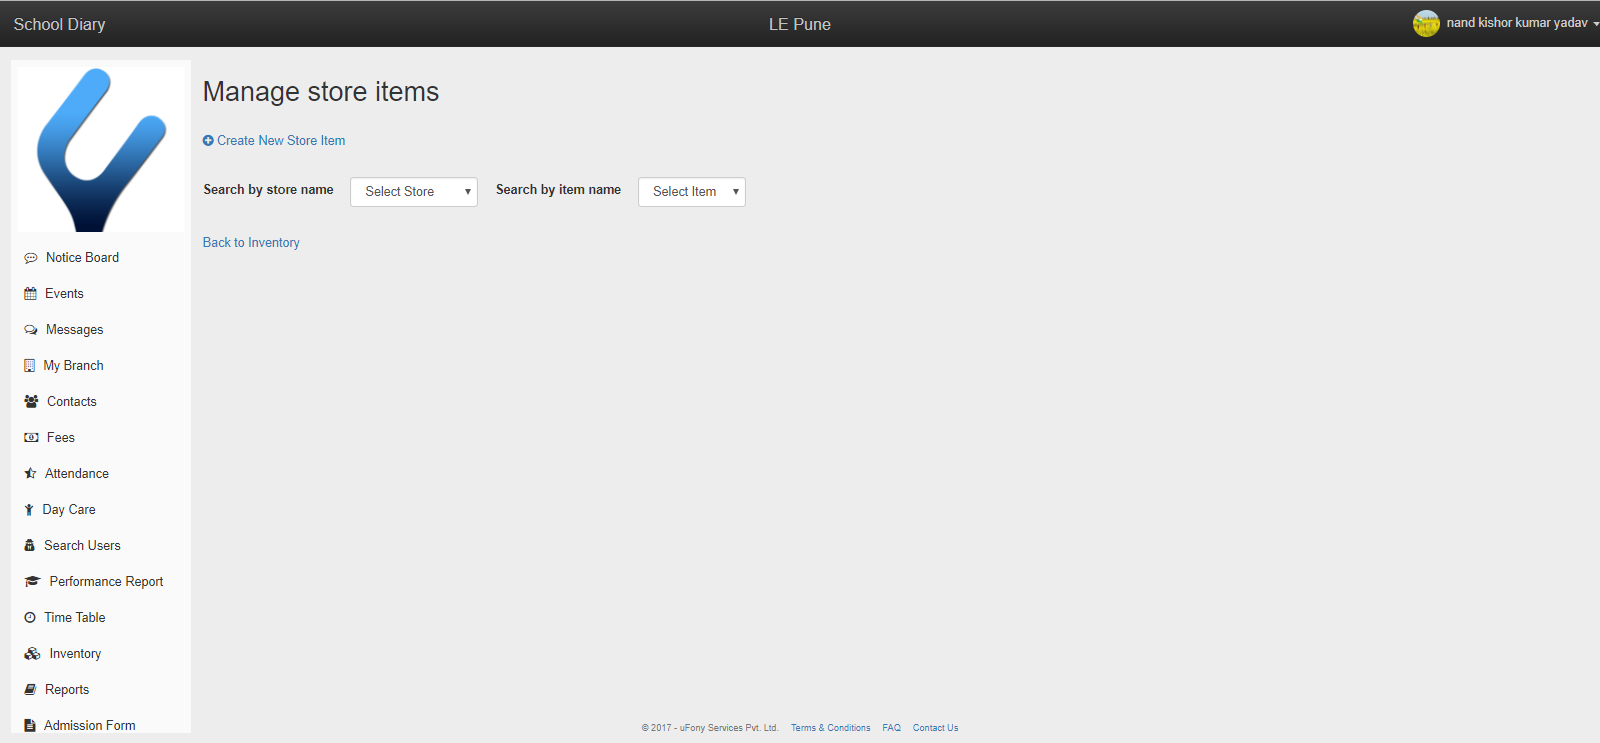
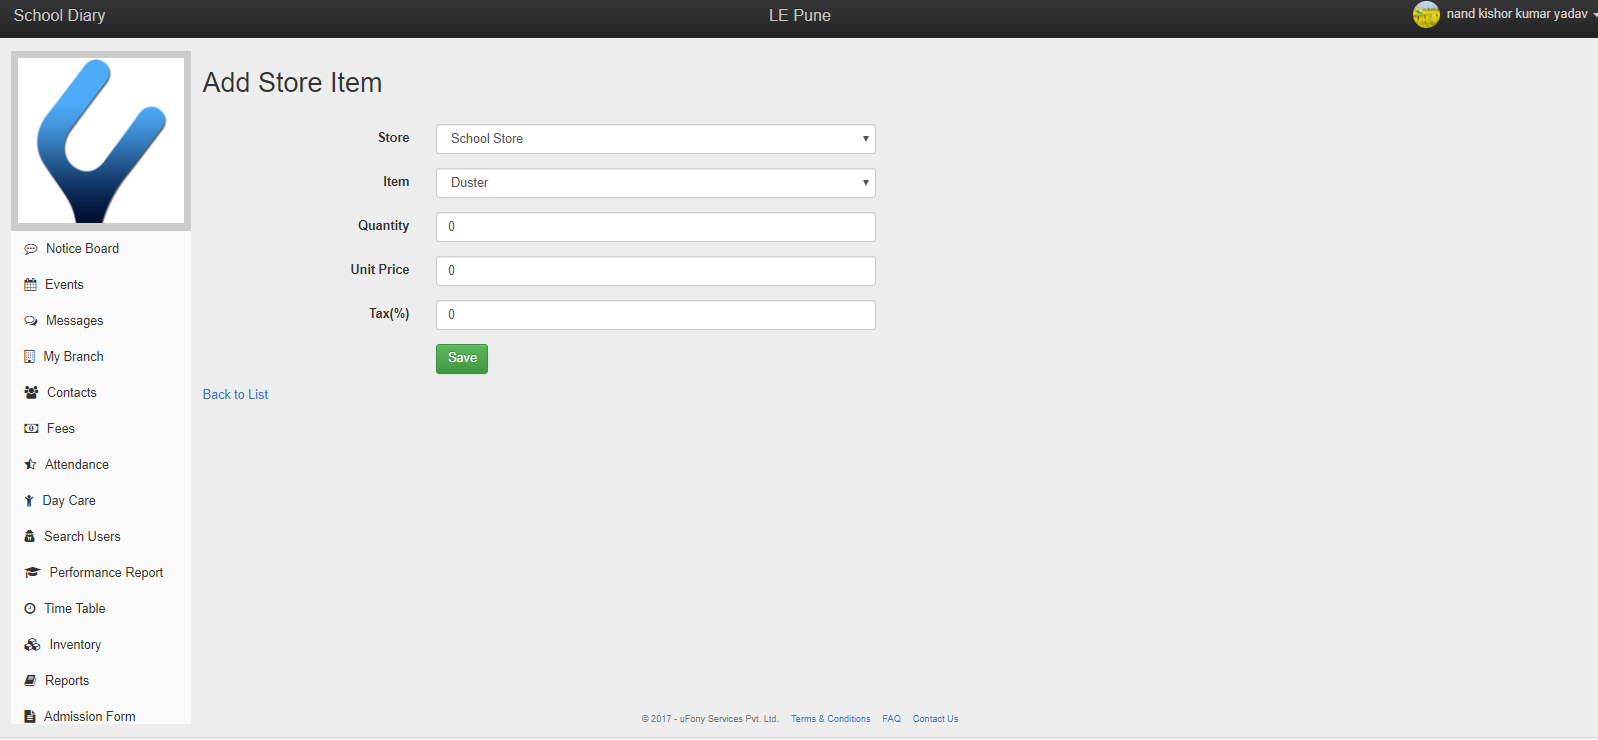
How can I add items in created store?
Select 'Store Item' menu from the inventory tab. Click on 'Create new Store Item' to add item into the store. Select the store name, item name and fill all the required fields (Quantity, Unit Price, Tax) and save.
How to add transactions (credit and debit) details for items?
Follow below steps to add credit and debit details for items.
Step -1 – Select 'Store Item' from inventory menu. Search the store name and item name from given lists.
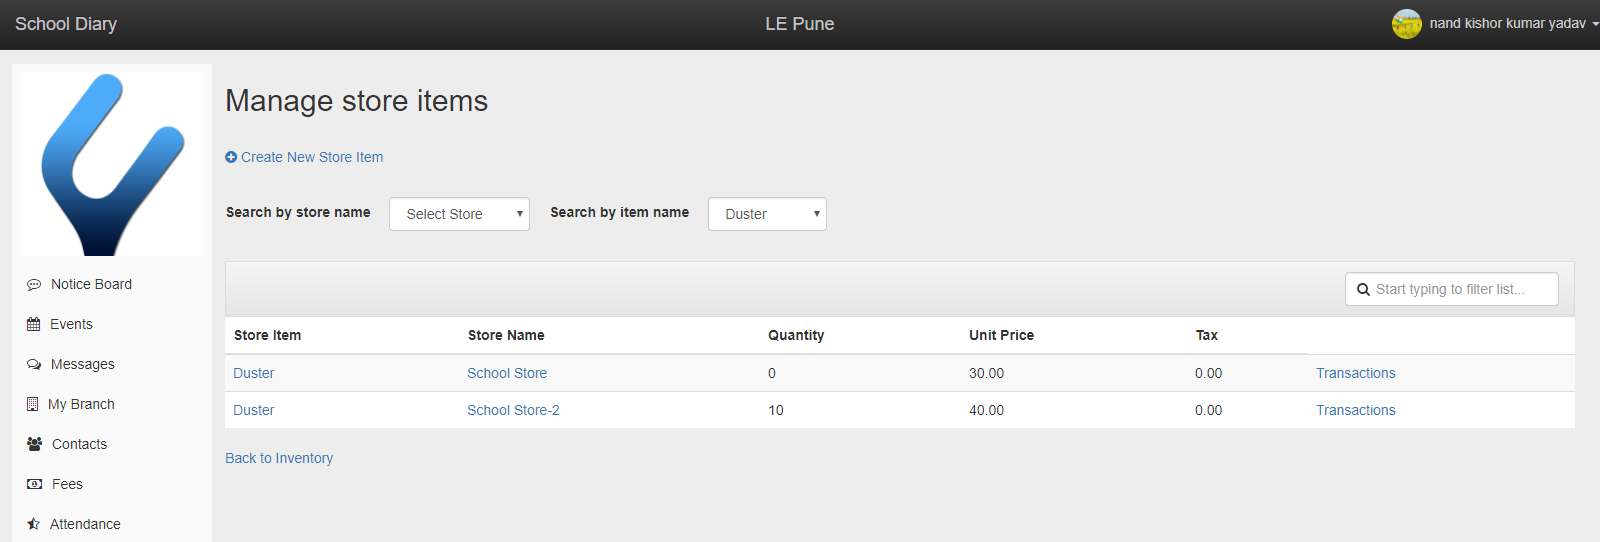
Step-2 - For a given item, select 'Transactions' link, here user can view all previous transaction for that store item. Click on 'Create New Transaction' link to add the details of credit or debit for selected item.
![]()
Step-3 Select action (credit or debit), enter quantity of the item and enter remarks if any. Click on save button to save the transaction.
![]()
Admission Form
What is the purpose of admission form template?
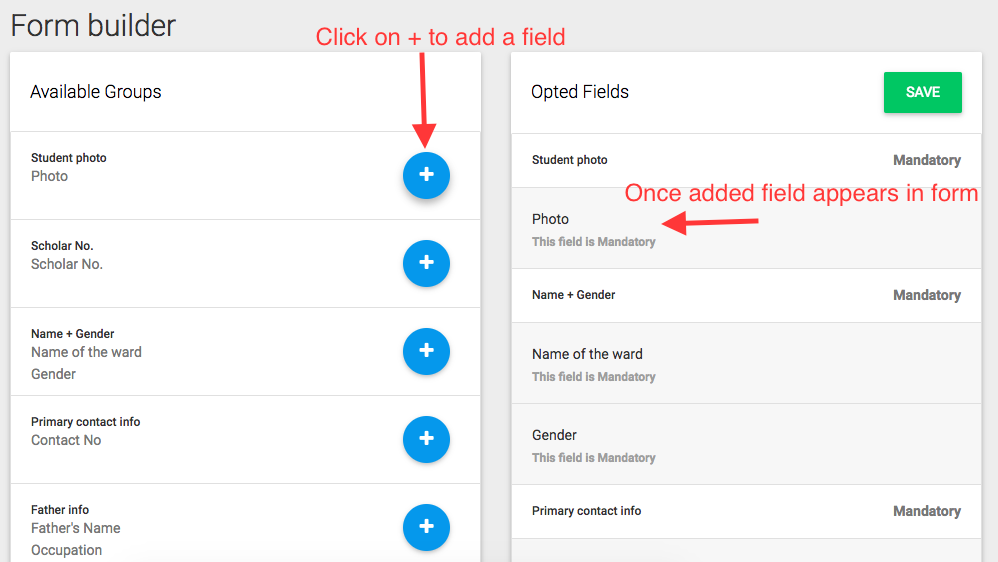
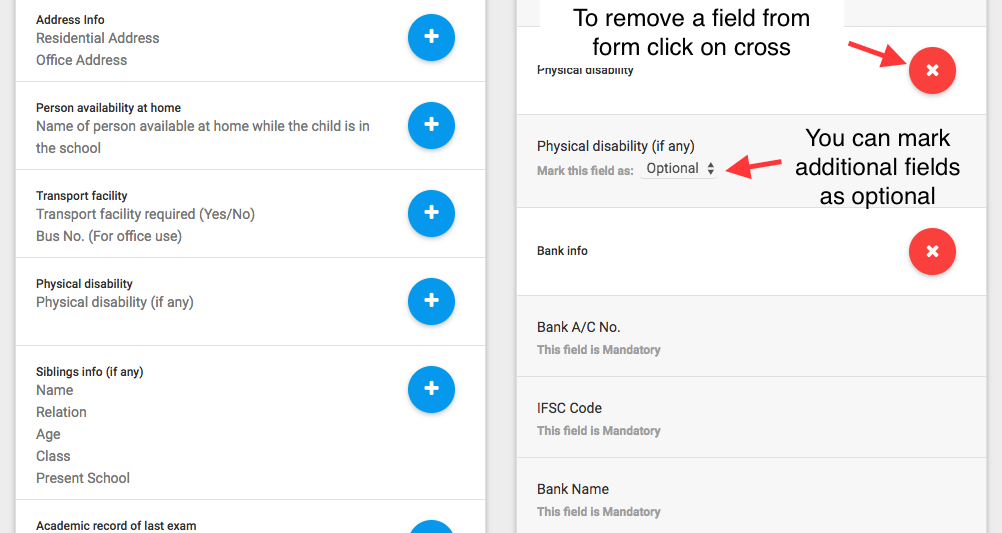
Every school captures some key information related to a child during Enquiry & Admission. For example – Name, Parents Name, address, contact numbers, picture, documents etc. However, each school may capture slightly different information. Some may capture last school certificates and some may not. Some may capture parents occupation details and some may not. To make it simple for schools, we have created an admission form template with all the fields required by schools. Schools can edit the template to choose the fields they require.
How to edit the admission form template?
Admin can edit the admission form template from 'Admission Form' tab from the left menu. Select 'Admission Form' menu and click on 'Edit form template' link.

Admin can add required fields from 'Available Group' tab to 'Opted field' tab to create a new form template.
Click on 'Save' option to save changes.
How can I add a new enquiry?
To add a new enquiry click on 'Add New Enquiry' button and fill all the required details of the student. Click on 'Save' to save the student details.
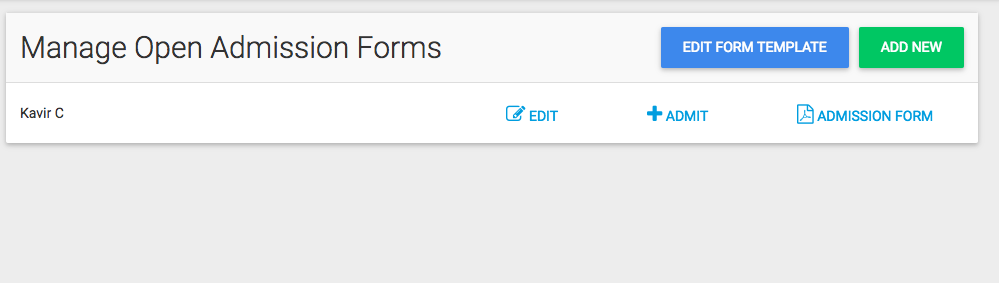
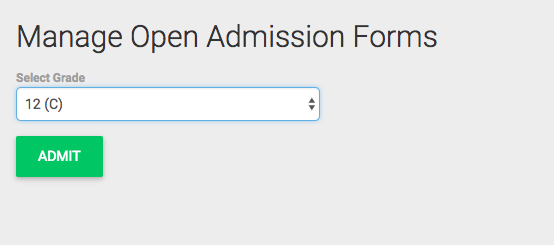
How to convert enquiry into admission?
To convert enquiry into admission please select '+admit' link for a particular child. Select the class & other required fields and save. Once added you can search the admitted child in the contacts menu -> All children information

Fee Management
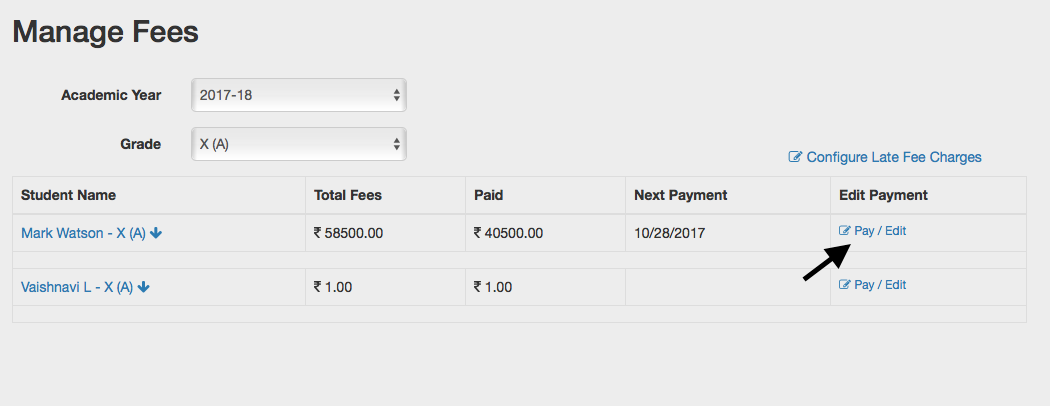
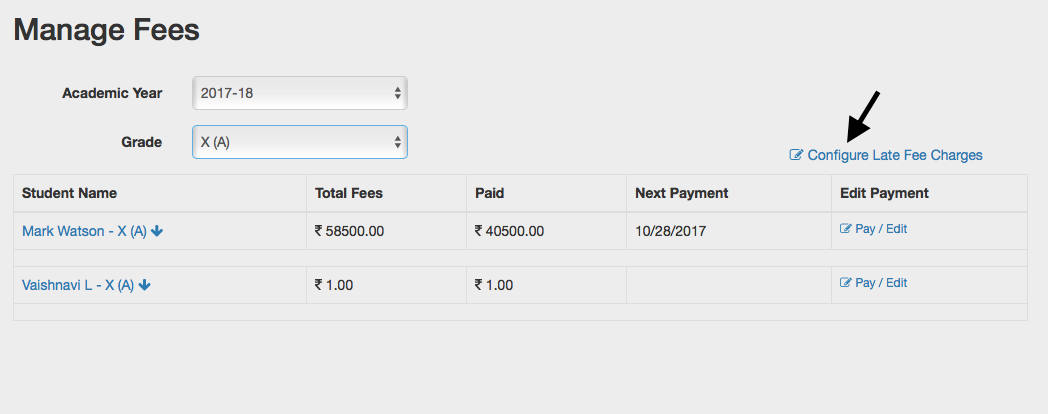
How to access fee details for a class?
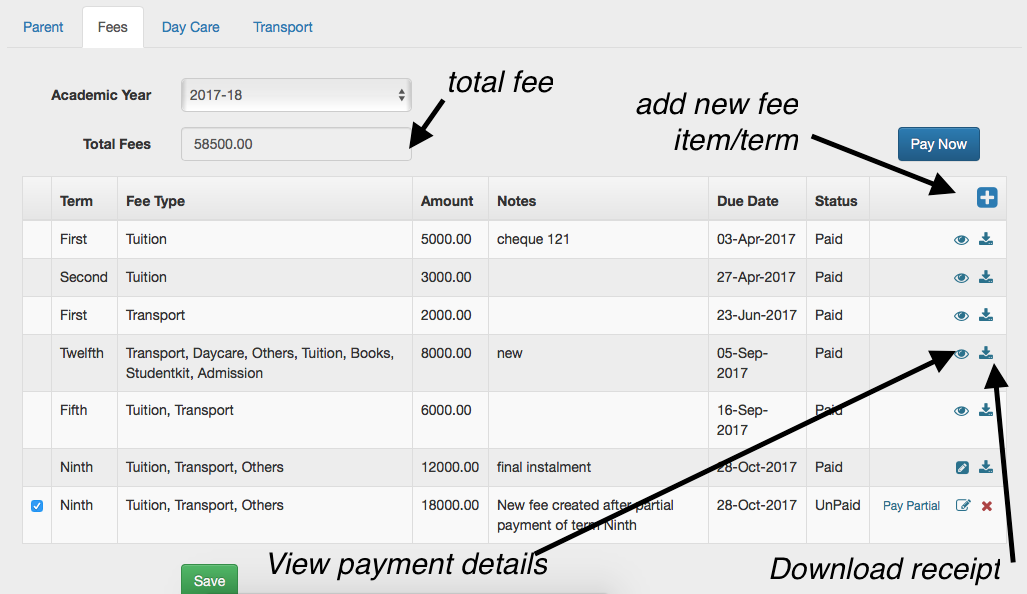
Click on the Fee tab on the left menu to access Fee module. By default the current academic year and one grade/class is loaded by default.
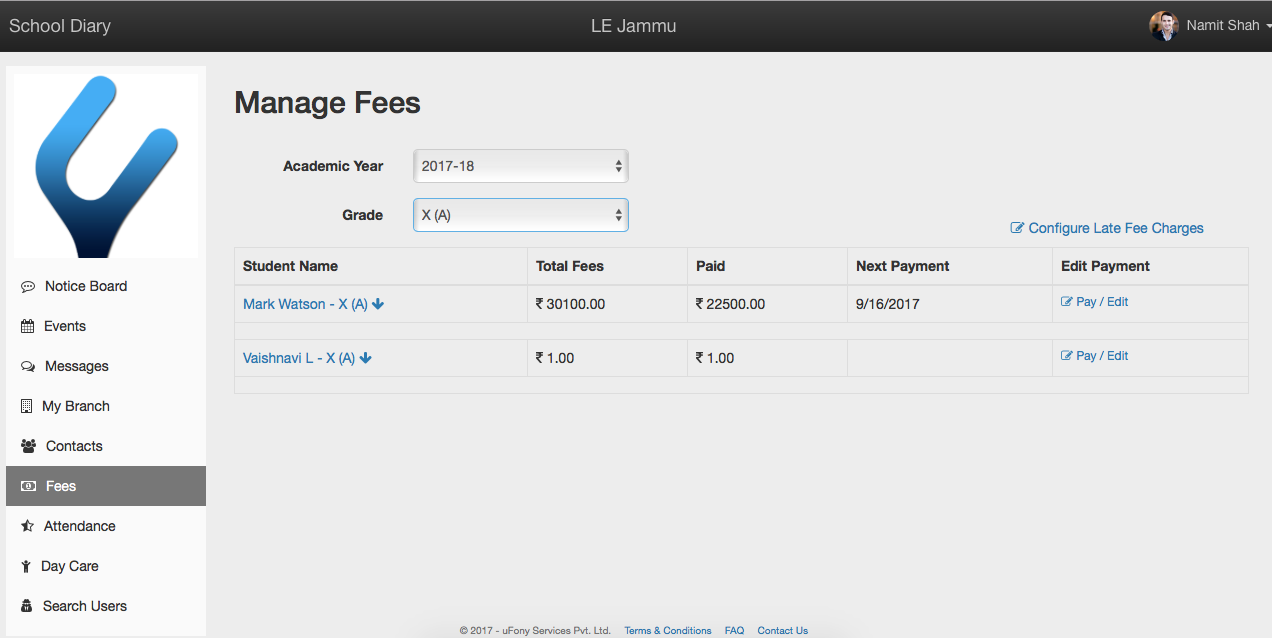
Click on "Grade" dropdown to change the grade and load data for that grade.
Load previous academic year data by selecting a new academic year from the Academic year dropdown.
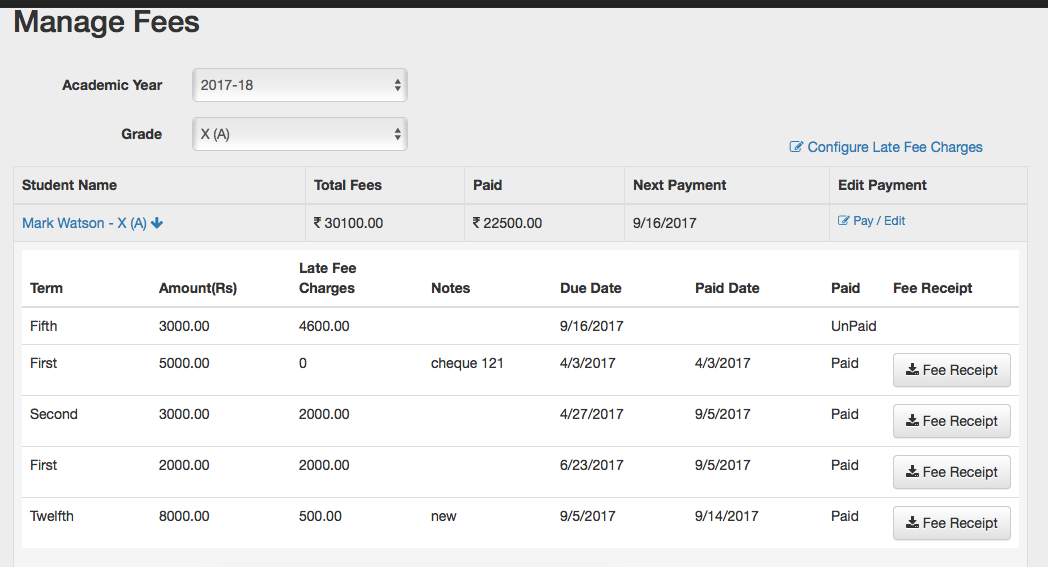
How to check fee details of a student?
Click on a student name to see the term wise fee details.
Each term will have fee, due date, paid status etc. For term fees already paid, a receipt can generated by clicking on Fee receipt tab.
How to configure fee for a student?
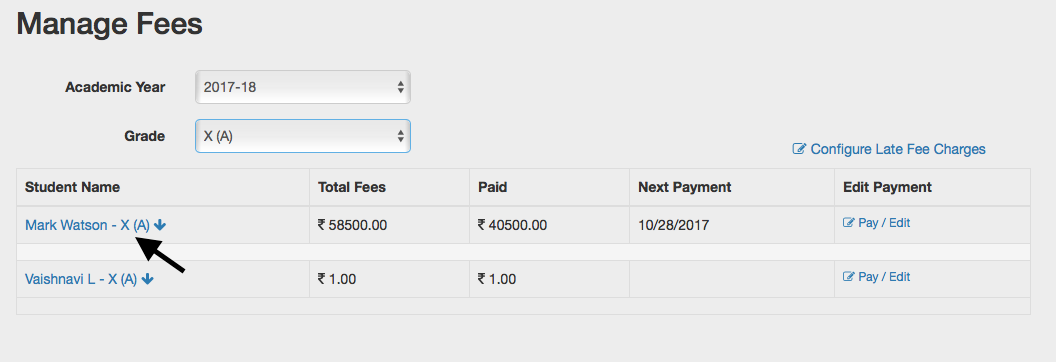
Step 1: Click on Pay/Edit link against a student name (refer screenshot below) to manage/edit fee for that student.
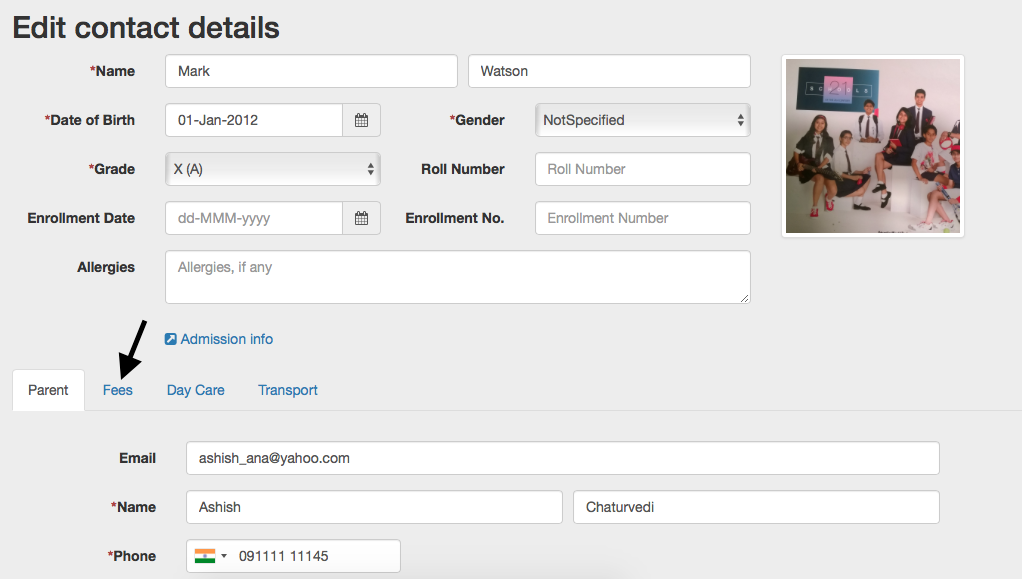
Step 2: Child profile information will be loaded. Click on Fee tab.
Step 3: Fee details will be loaded. Click on + icon to add more fee line items. Click on eye shaped icon to view past payment details & click on download icon to download term wise receipt for paid fees.
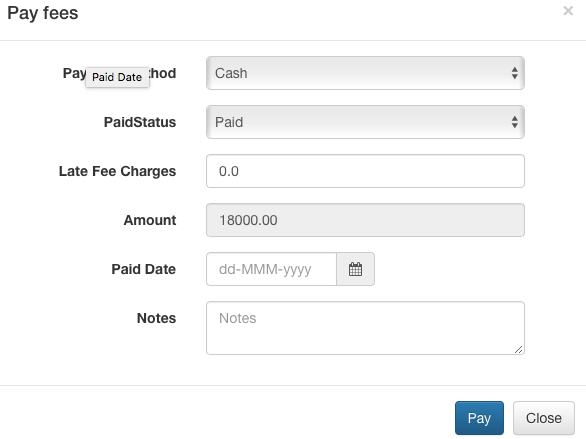
How to pay in full for one or more terms?
Step 1: On the fee detail page, click on terms for which payment is being made and then click on pay now button.
Step 2: Fee payment capture window will appear. Fill the payment method (Cash, Cheque, card etc), change the status to paid, late fee charges if any, paid date and comments. In case of cheque – cheque number, issuing bank details etc are to be captured. Once all values are entered click on save.
How to make partial payment?
A parent can also make a partial payment too for a term.
Step 1: For a partial payment click on term for which partial payment is to made and then click on Pay partial link on the right.
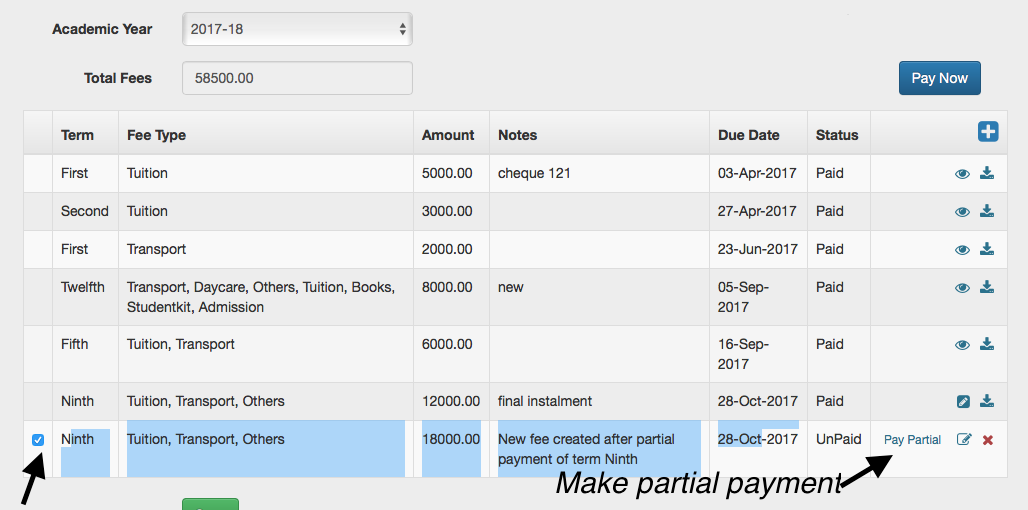
Step 2: Fee payment capture window will appear. Fill the payment method (Cash, Cheque, card etc), change the status to paid, late fee charges if any, paid date and comments. Please specify amounts for each line item. By default the original values will be shown.
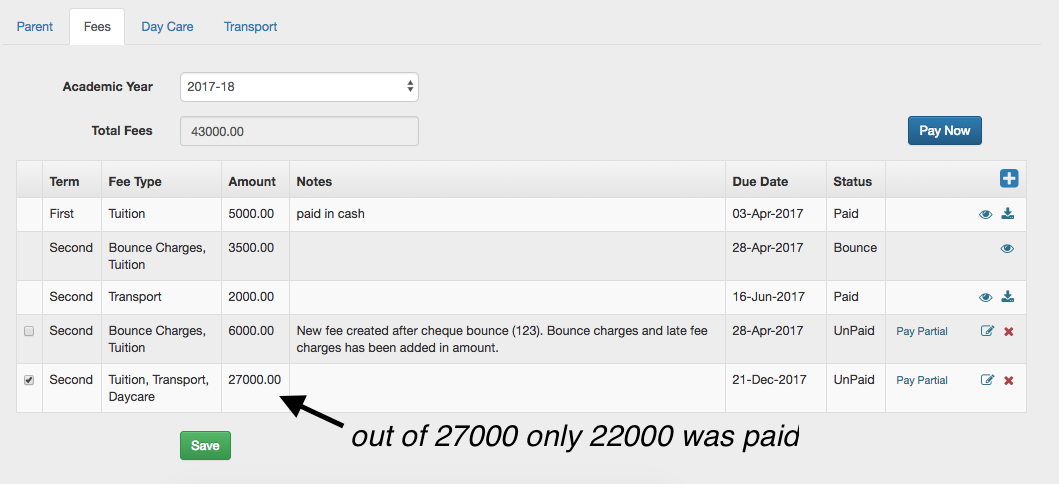
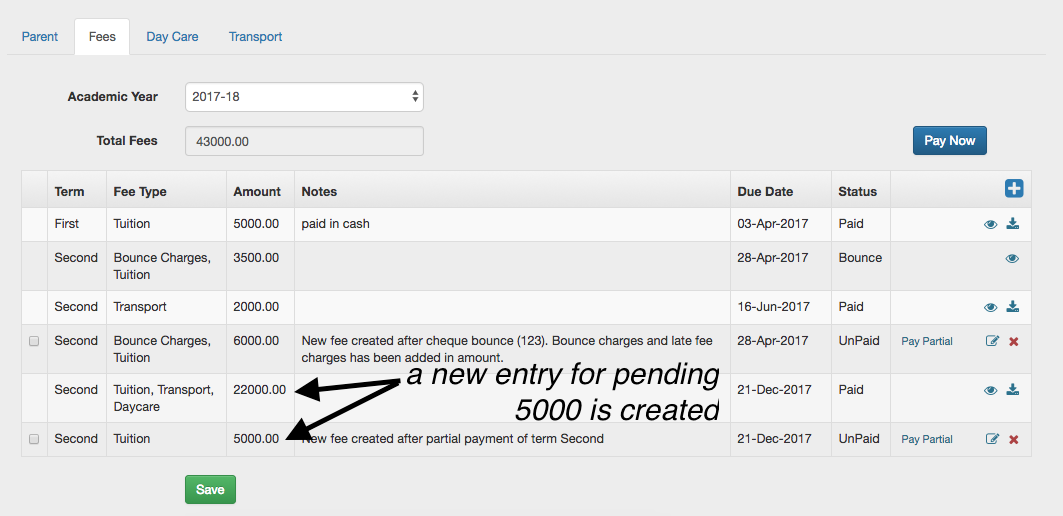
Step 3: if the total paid amount is less than the due amount, a new entry for the remainder (due amount – paid amount) will be created with appropriate comment. For ex if due amount was 27,000 and only 22,000 is paid then a new entry of 5,000 will be created with the same due date as original entry. Please refer to the screenshots below
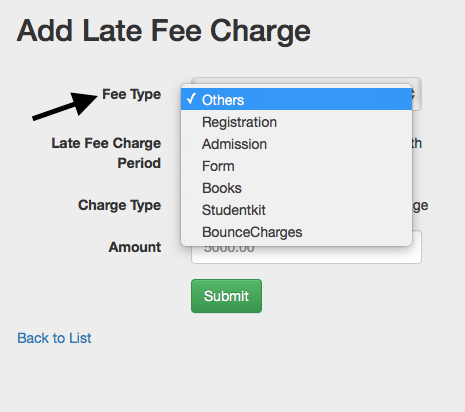
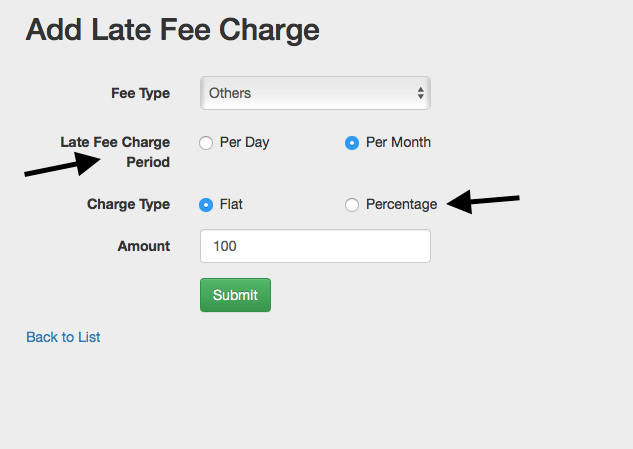
How to configure late fee ?
Step 1: Go to Fee module and click on Configure late fee charges link.
Step 2: create a late fee template for each fee type. For example if you have Tuition, Transport & Daycare, you need to create a late fee configuration for each item separately.

Step 3: select appropriate late fee period, charge type and amount to configure the late fee.
System will automatically add late fee for each fee type once it is configured. Late fee charges will be shown to admin when the payment is made. Admin can override and chose a different late fee or nullify it on its own discretion.